
A common challenge for people who sign up for Instrumentl’s free trial is that they just don’t have the time to explore the platform.
When we dug deeper, it became clear that it’s not just about time.
It’s about feeling overwhelmed.
It’s about the discomfort of learning something new from scratch, and the anxiety that arises when you feel that you’re not moving fast enough.
This is why we created a day-by-day guide for your free Instrumentl trial! It includes:

An estimated time investment for each day (no more than 45 min)

Clear steps outlined
.jpg)
A checklist of things you should complete on each day
.jpg)
.jpg)
Downloadable scorecard for evaluating Instrumentl
We strongly recommend you to schedule a 30-min meeting with your team members for the last day of your trial. Do it now so that you can move through your trial period meaningfully and have a set time for discussing your impressions and the quality of grant opportunities you found.
So, before you jump in exploring your daily schedule:
1. Book a meeting with your team in advance
2. Learn why having a trial kick-off call is important for your success
Note: Please note that this is just a suggested schedule, not a definitive way you should interact with Instrumentl. If you have more time on your hands, feel free to merge days into one. If you have specific interests and want to discuss your organization’s needs, reach out to our customer success team at hello@instrumentl.com.
Your Daily Schedule
Main activity
Estimated time
Theme
15 minutes
Get started 🚀
45 minutes
Bring prospecting & tracking together 🤝
45 minutes
Jumpstart team collaboration 💪
45 minutes
Learn how to act on data 📊
45 minutes
Put new funders on your radar 🔎
30 minutes
Add more relevant funders to your list 🤓
30 minutes
Stay organized & keep everyone on the same page 💯
15 minutes
Know who’s doing what & gain control over your pipeline 😉
15 minutes
Stay on top of your work & never miss a deadline 📅
15 minutes
Imagine you already won that grant 🏆
10 minutes
Practice the power of self-fulfilling prophecy 💰
5 minutes
Learn more about reports and why they are beneficial 📝
45 minutes
Rinse & repeat to make an impact 💥
45 minutes
Have a meaningful discussion about your grant opportunities and Instrumentl 🗣
Day 1: Create your first project & add team members
Estimated time: 15 minutes
Theme: Get started 🚀
Day 1 checklist:
Once you sign up for your Instrumentl free trial and access the platform, you’ll be prompted to create your first project.
Instrumentl glossary: A project is like a "workspace" with two components: a saved search & your saved grants. Projects typically map to ongoing program areas at an organization. Each week, you'll get an email with new matching opportunities for your projects.
Creating a project is a very easy 3-step process. Think of it as filling out a simple form about your nonprofit organization.
Step 1: Tell us about your organization’s location and choose your fiscal year.
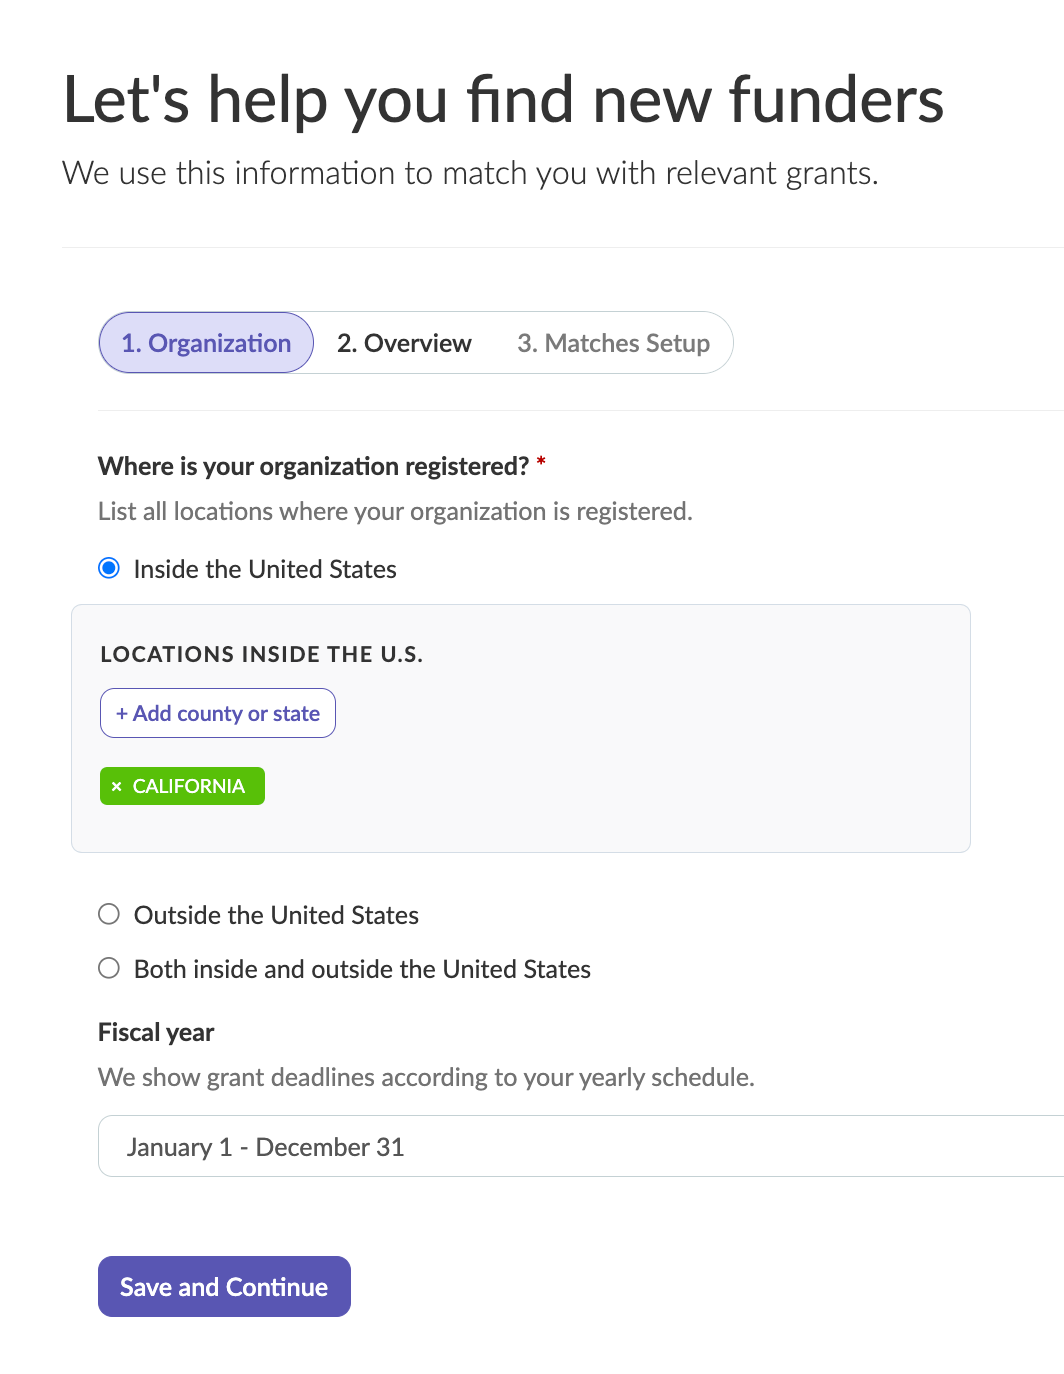
Step 2: Name your project and decide how you’d like to use Instrumentl. Some organizations need only grant tracking features while others want to discover new funding opportunities as well.

Step 3: Provide more information about your fields of work to get relevant matches to funders and funding opportunities.
This third step is crucial for discovering good-fit funders for your organization. It’s where you’ll check your Applicant Type, geographical areas your project serves, and your fields of work.
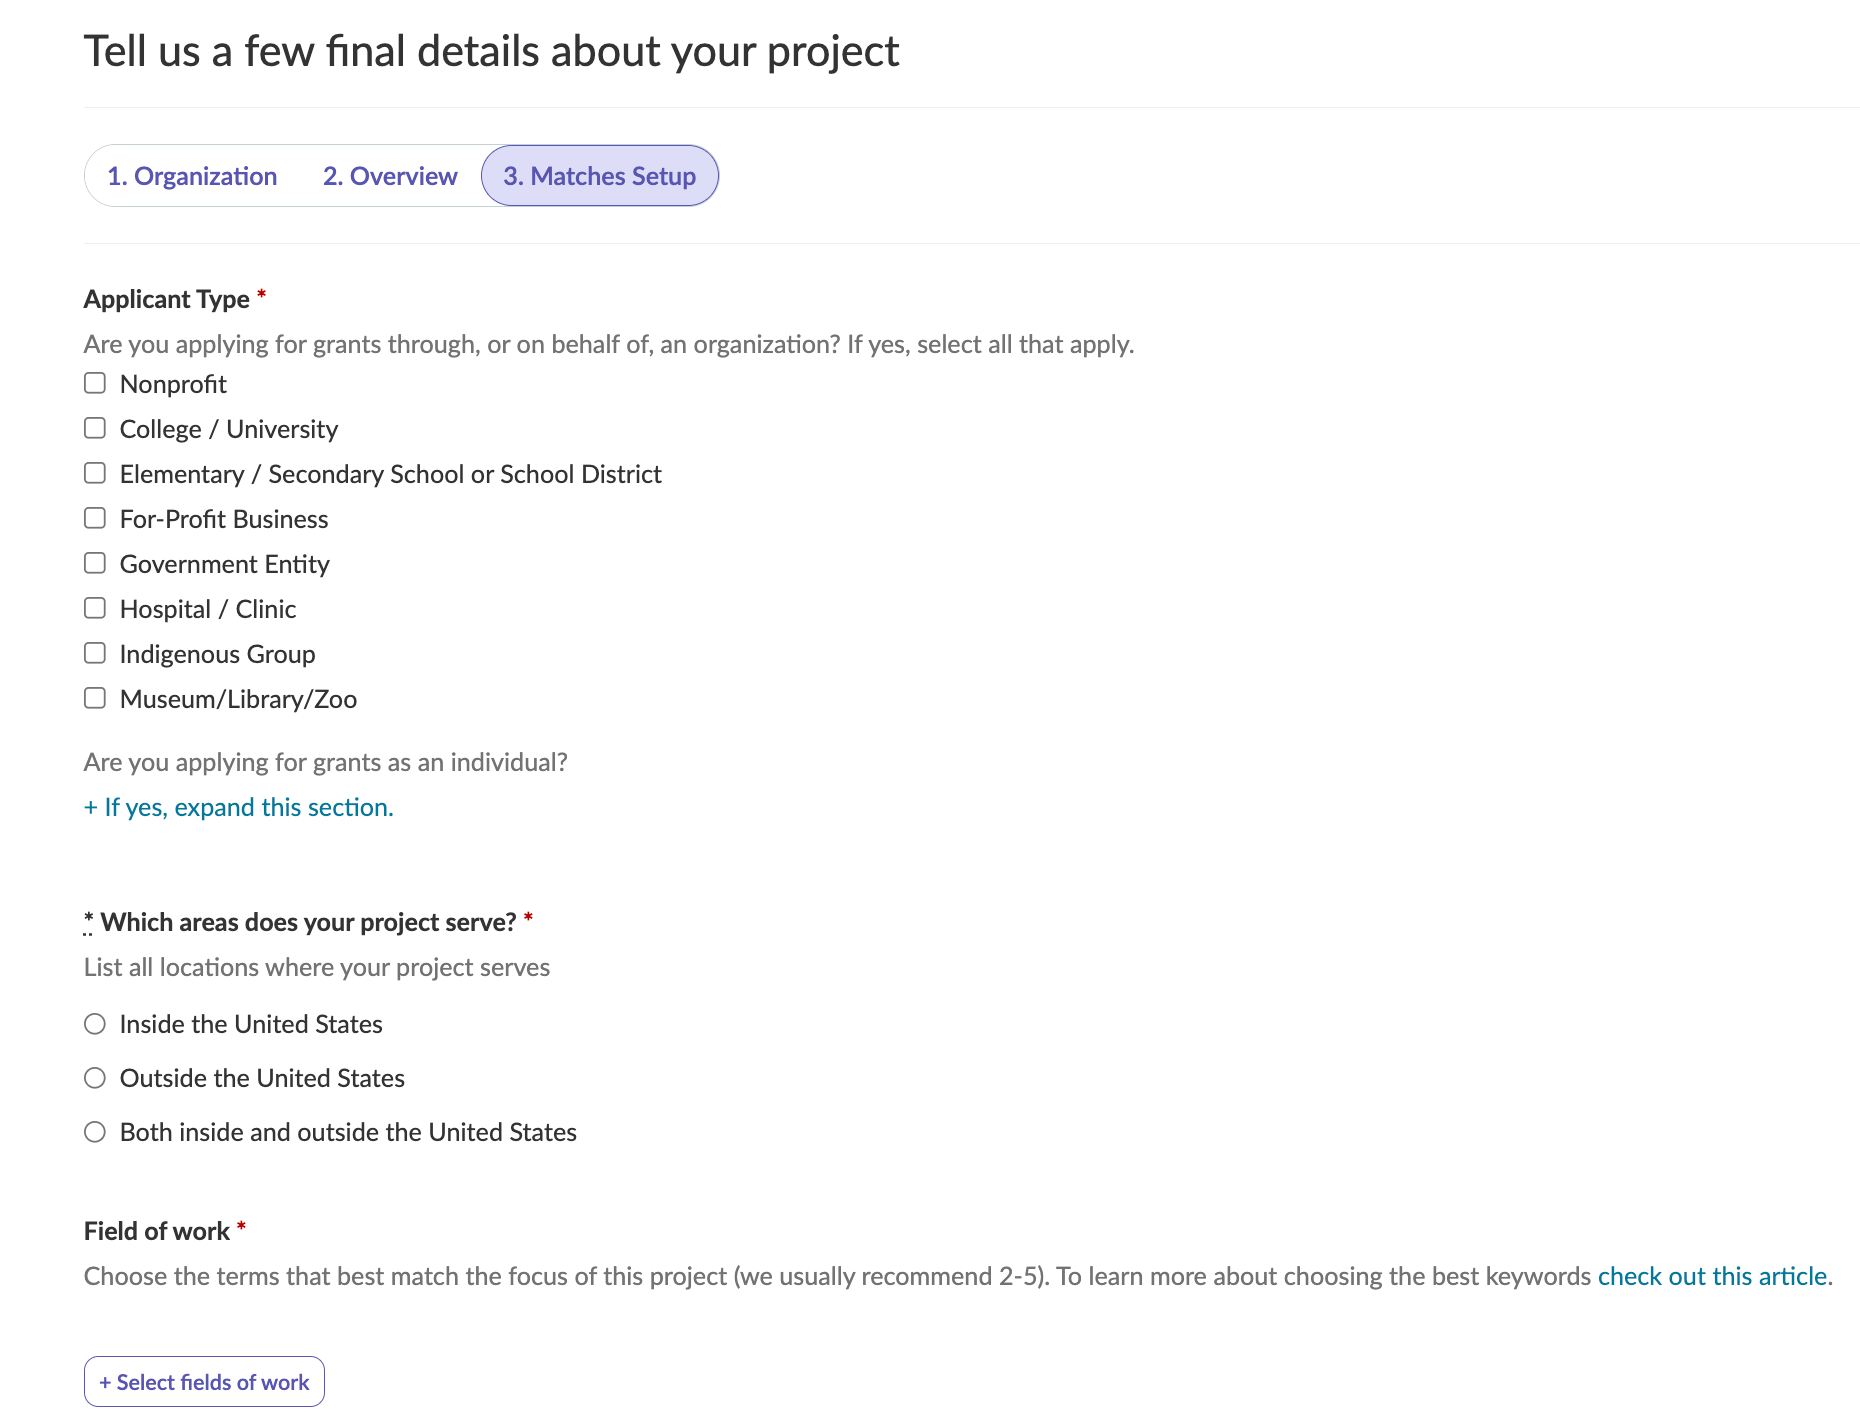
Step 4: Select relevant fields of work. You can search for the term and get suggestions, or you can browse all categories and find the ones that are suitable for your project.
.png)
Pro tip: Keywords have a major impact on the quality of your grant matches. By selecting more specific keywords that hit “the nail on the head” for your program’s mission, you’ll remove broader matches that may not be as good of a fit.
Check out the short video on how to make the most of keywords.
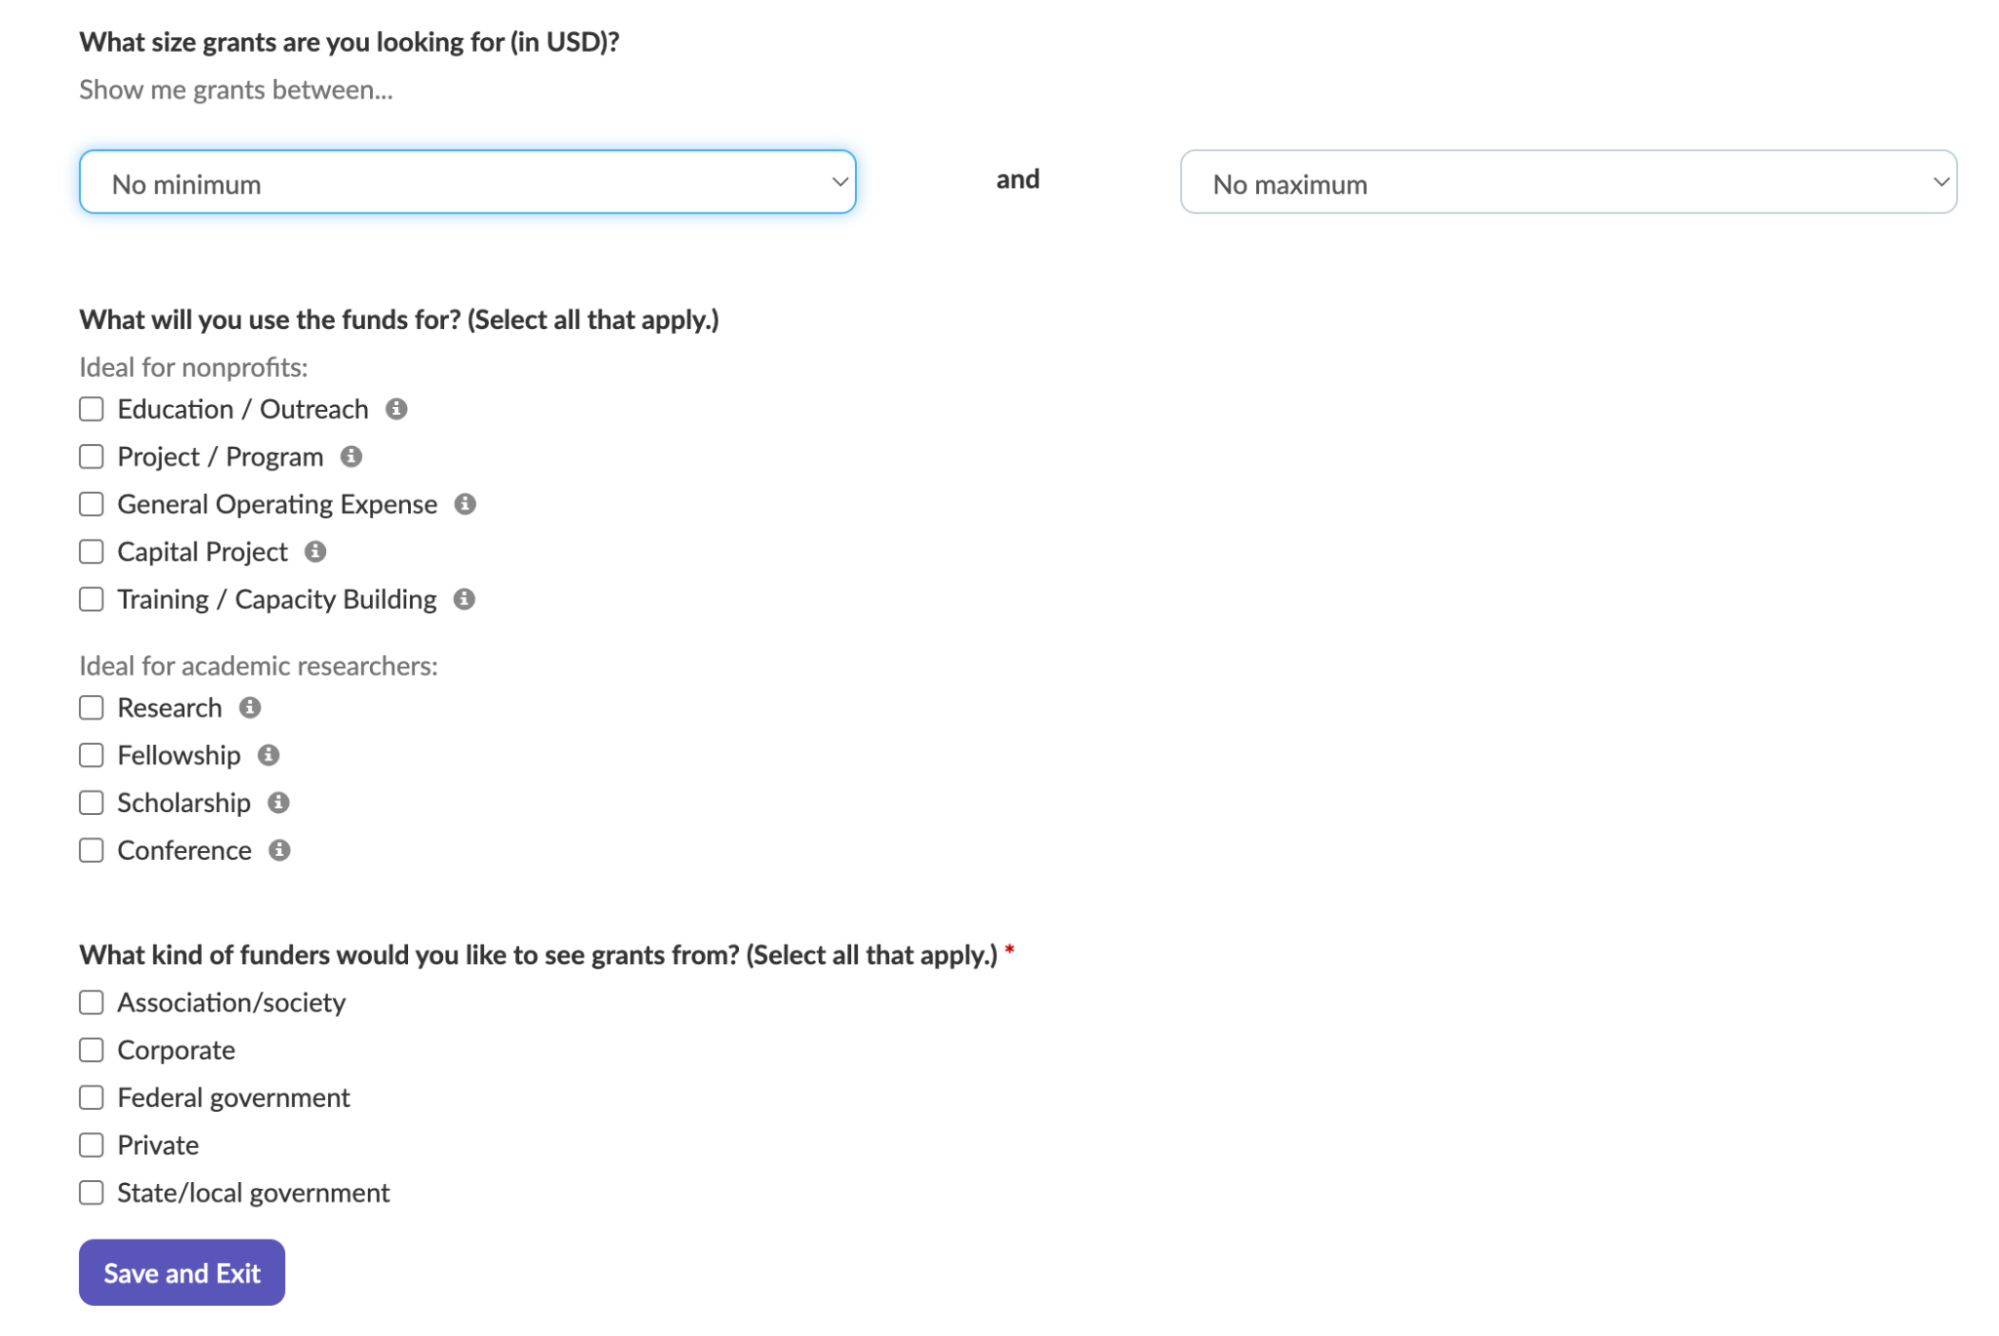
Step 5: Finish setting up your first project by selecting your desired grant size, use of funding, and the type of funders you’d like to get grants from. When you’re done, just click on “Save and Exit”.
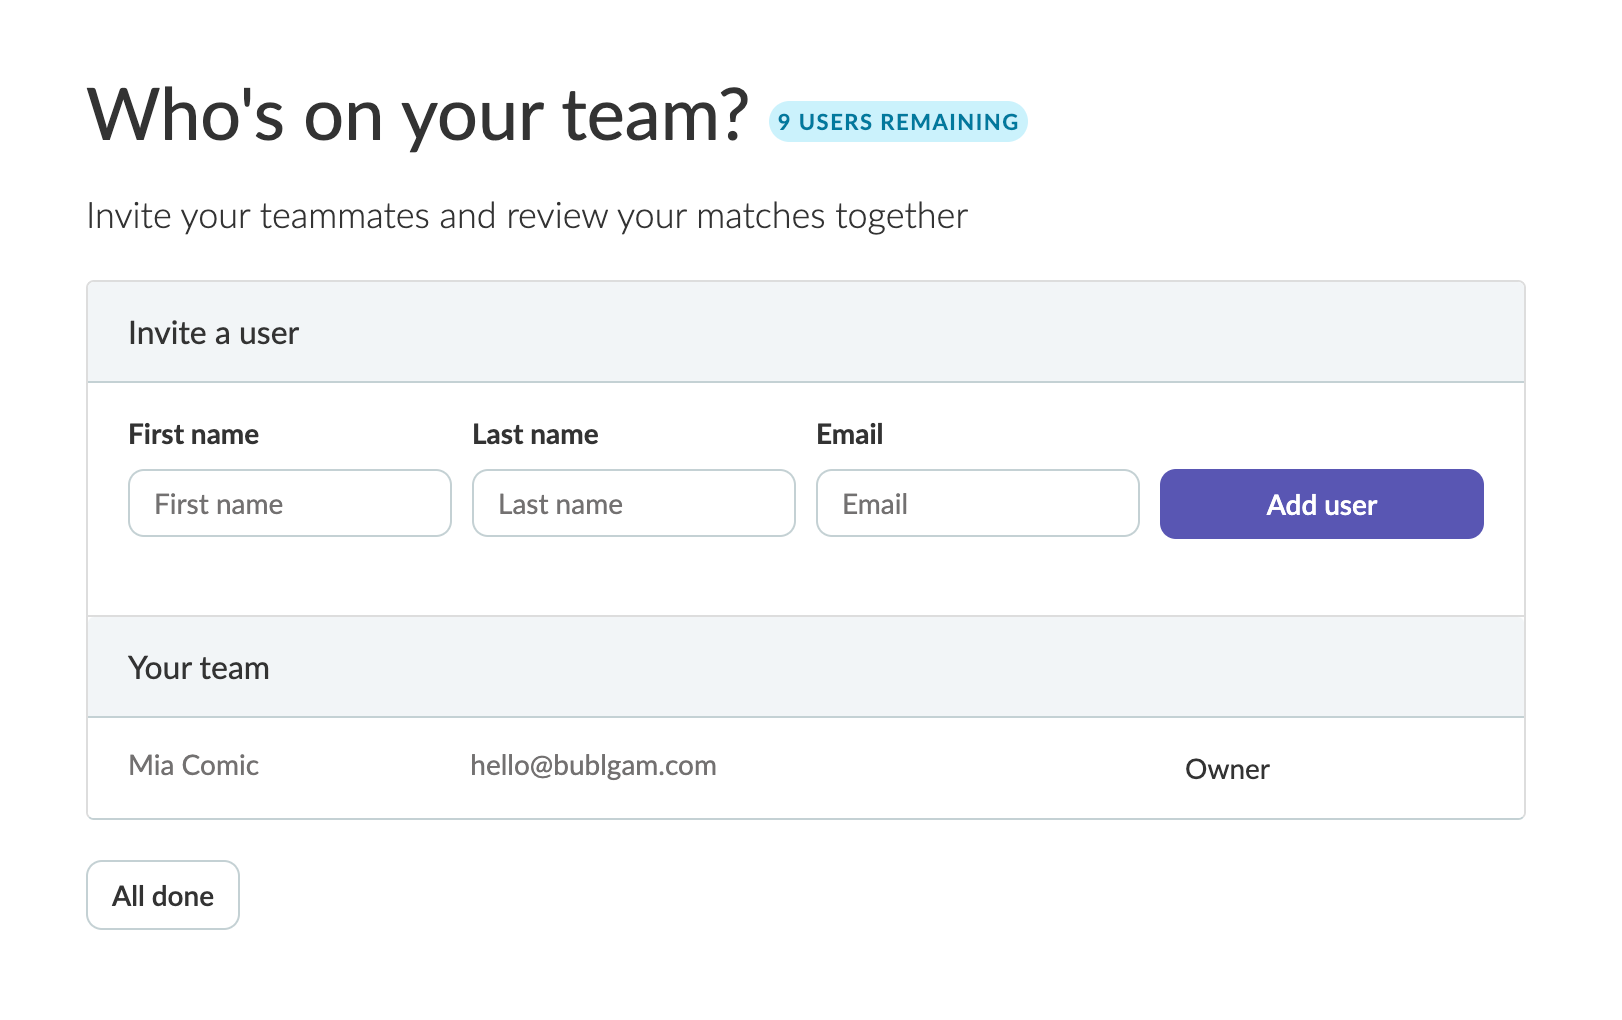
Step 6: Add your team members! For each Instrumentl trial account, there are a total of 10 seats available. Make sure to provide access to all people who will be potentially using Instrumentl in the future so that they can evaluate the platform first-hand. Each person you invite will get notified via email.
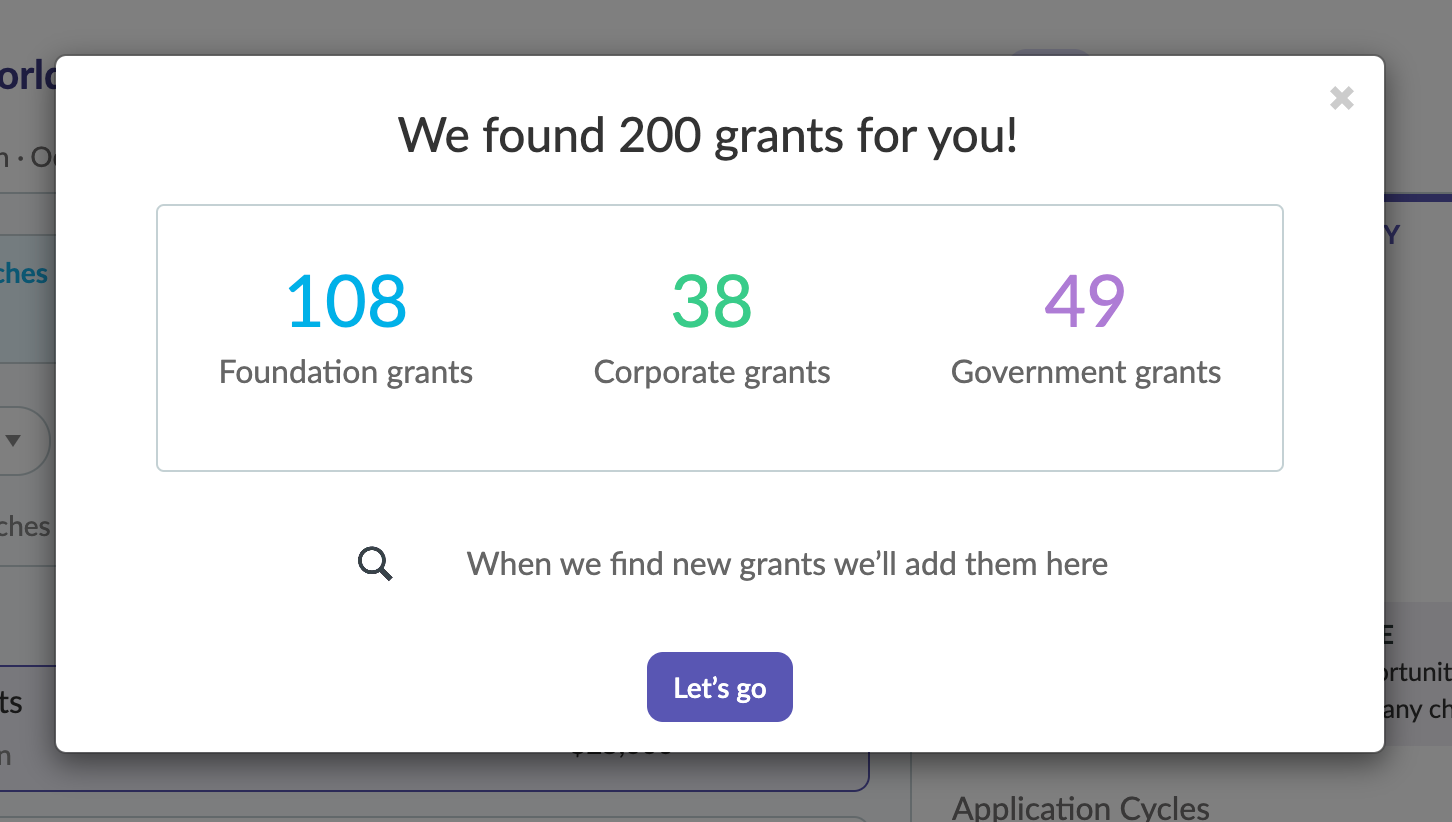
Step 7: Enjoy the fact that Instrumentl found hundreds of grant opportunities for you in seconds! Once you click on “Let’s go”, our lovely Becca from the Customer Success team will give you a quick tour of how Matches in Instrumentl work.
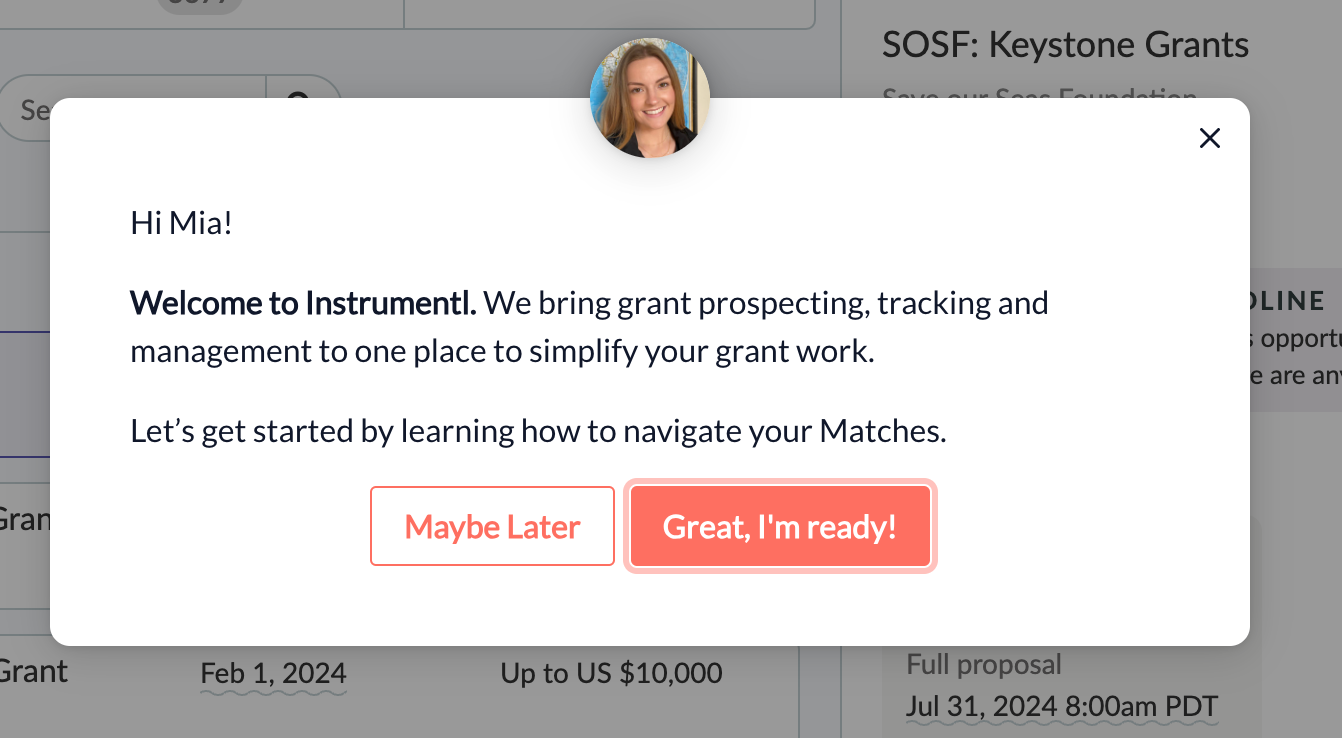
Step 8: Click on “Great, I’m ready!” to learn the basic navigation of your Matches. This quick tour will help you prepare for day 2.
When you’re done, you can sit back and enjoy the fact that you’re one step closer to making your grant work much simpler and easier. And it took just 15 minutes.
Day 2: Upload 10 historical grants & apply filters to narrow down your search
Estimated time: 45 minutes
Theme: Bring prospecting and tracking together 🤝
Day 2 checklist:
Instrumentl glossary: A Funding Opportunity Match on Instrumentl refers to a funding opportunity with public information on the funder's website that has an open way to apply or submit an LOI. Opportunities come from foundation, corporate, or government sources, directly from the funder's website.
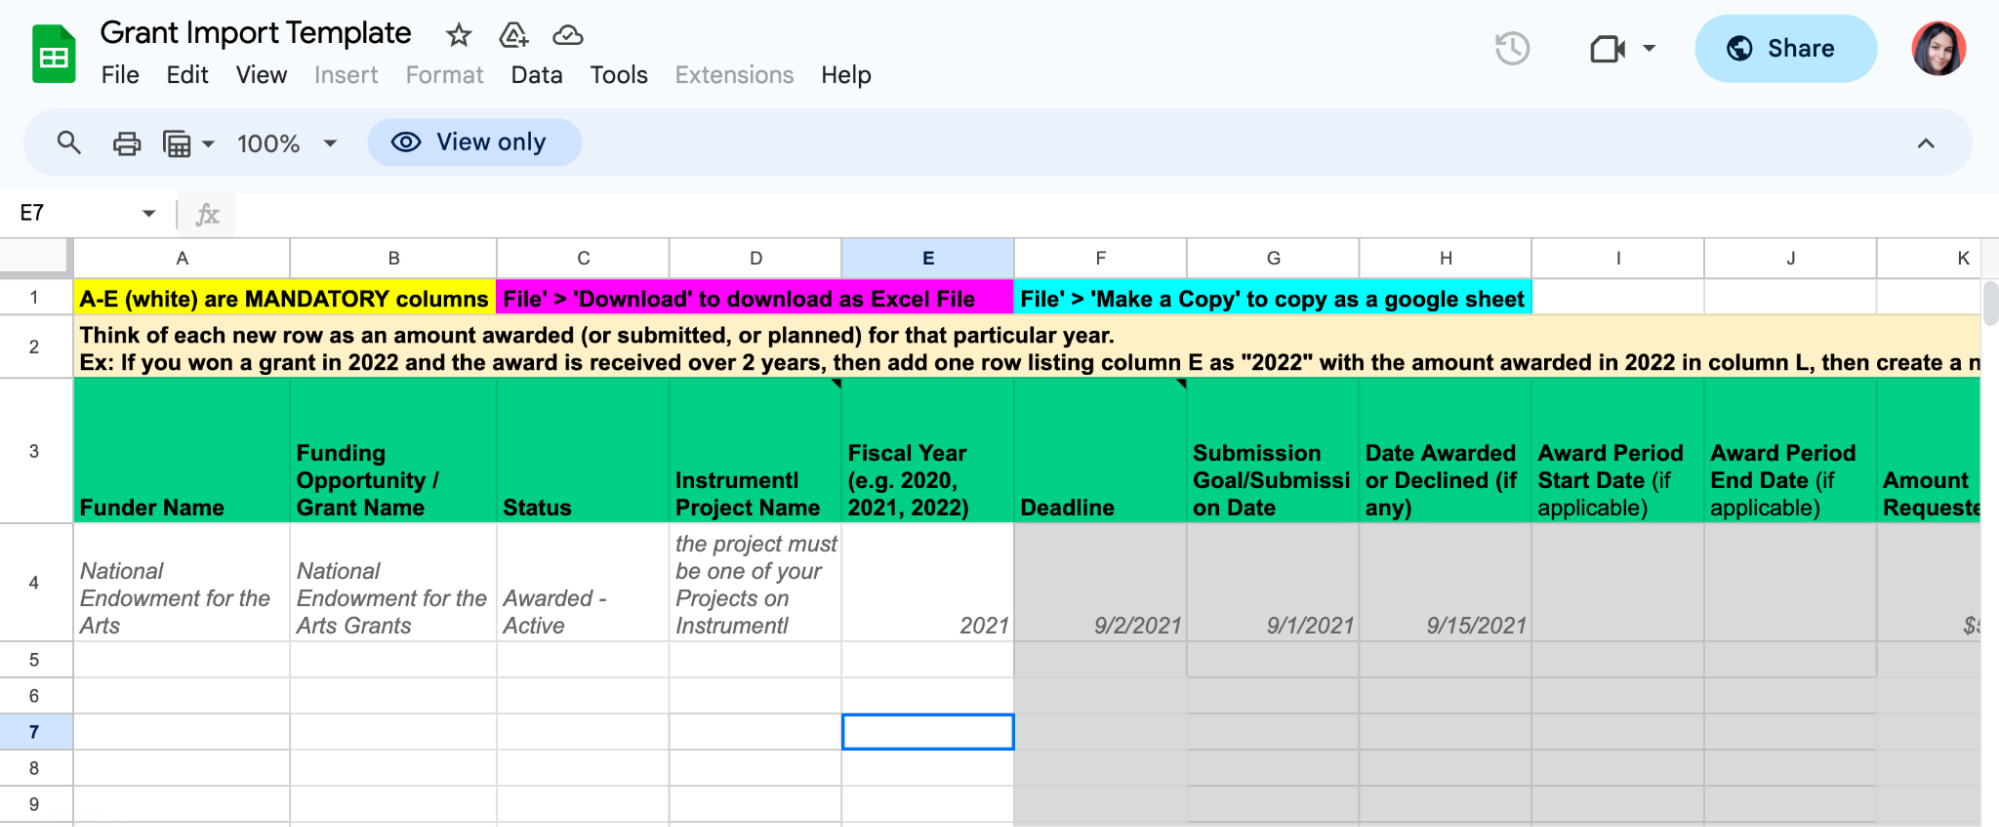
Step 1: Click on the “Tracker” to bring your historic grants to Instrumentl. Then explore the template you need to use to properly import your grant data
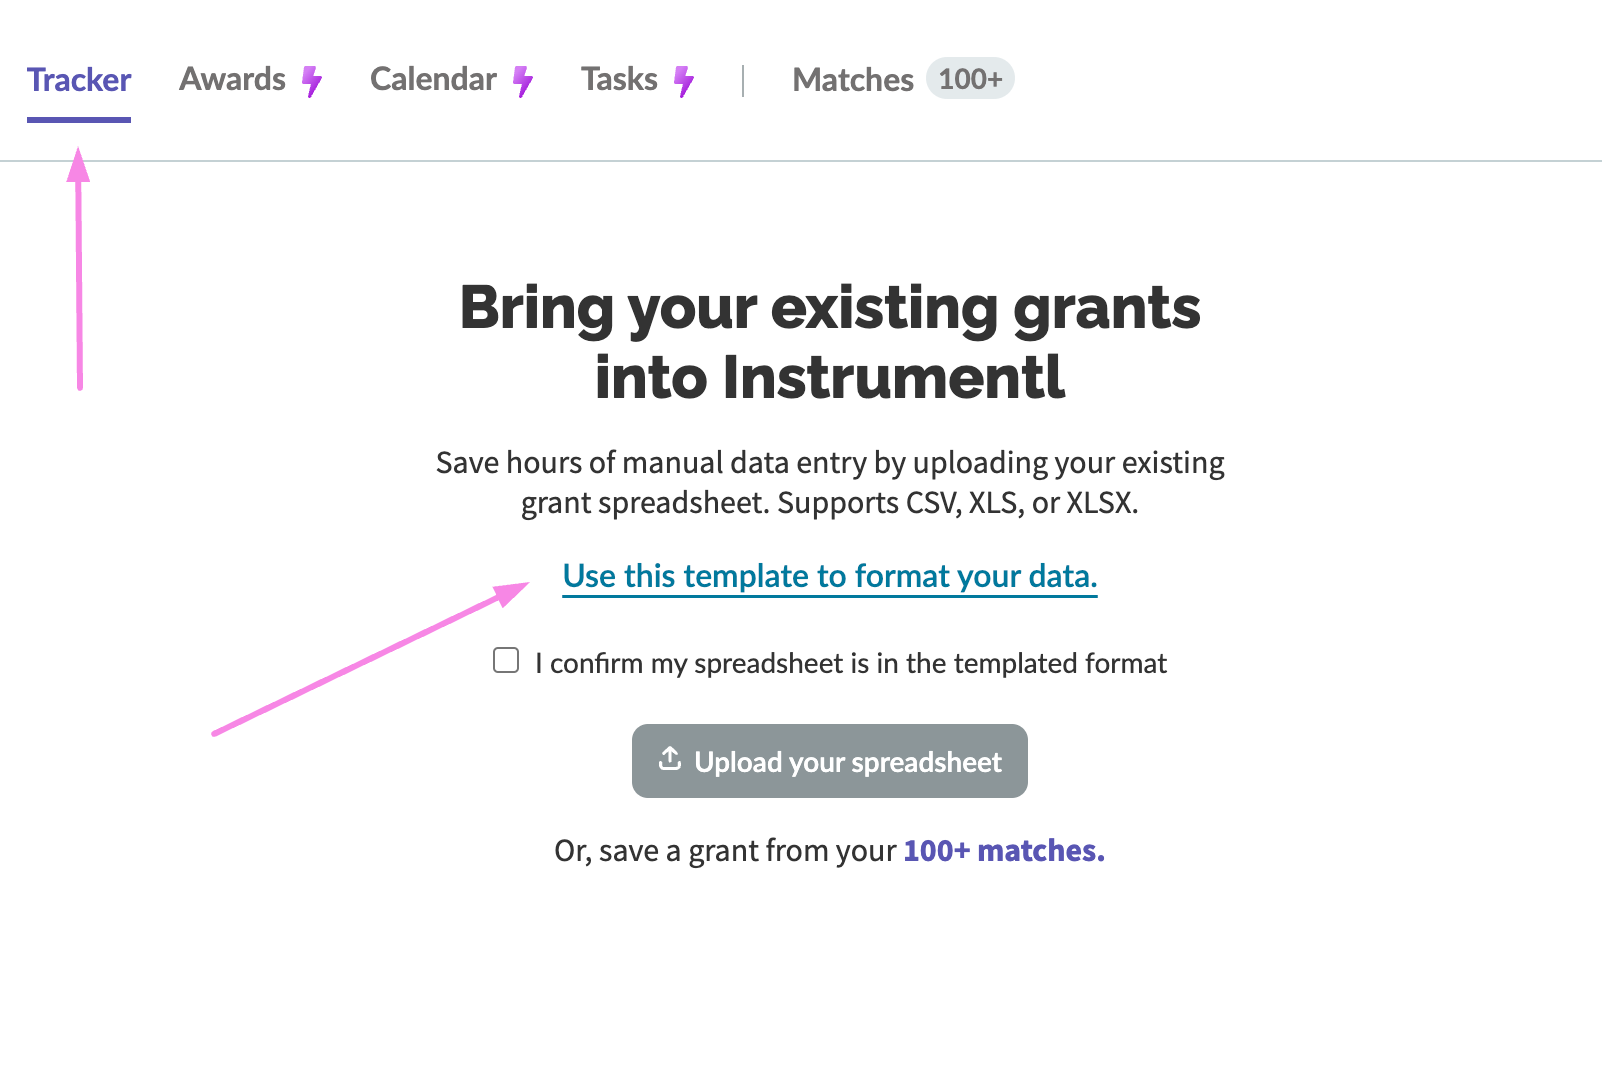
The spreadsheet template is quite simple to use and it comes with straightforward instructions.
Please note that once you upload your spreadsheet, your grants will not get automatically inserted into Instrumentl. It typically takes a few days before they get processed manually by our team. But that’s fine because in the meantime, you can start learning about grant prospecting with Instrumentl!
Pro tip: Learn more about importing your grants into Instrumentl from Amélie!
Step 2: Try out different filters to narrow down your grant search.
You don’t want more funding opportunities. What you do want is more relevant funding opportunities. Filters play a key role in separating the wheat from the chaff here. Once you master filters, you’ll discover amazing RFPs for your organization.
You can see main three ways to sort your Funding Opportunity Matches:
- Best Match
- Filter
- Search (typing in a keyword to filter through the matches)
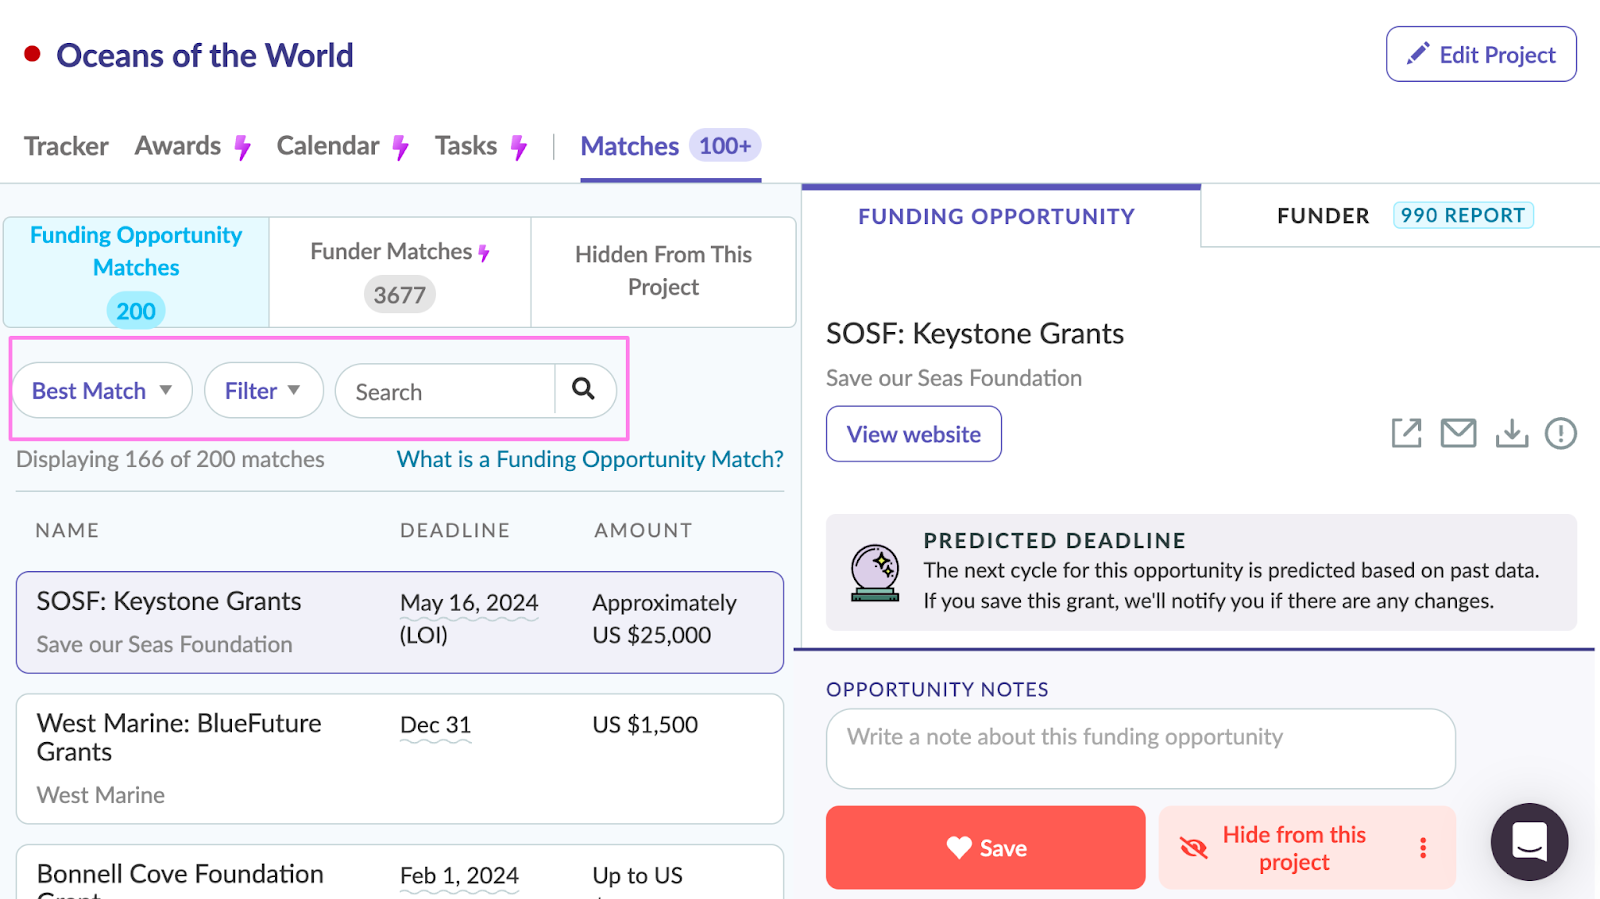
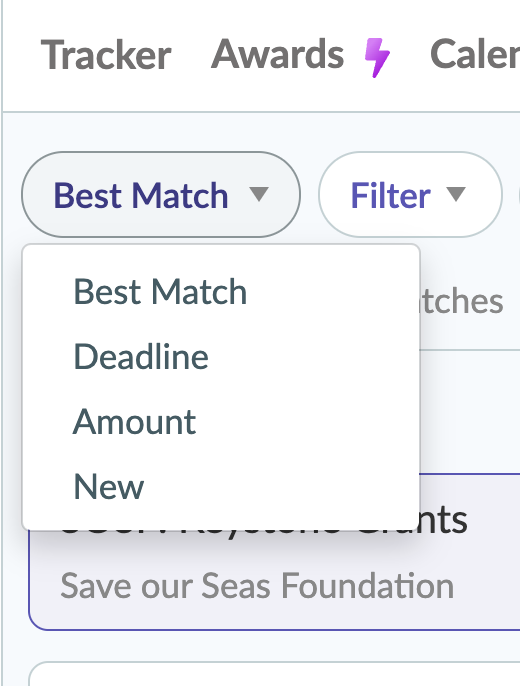
You can sort your opportunities based on the Best Match (Instrumentl sorts results based on the info you shared during the project setup), deadline, amount, or recency (i.e. whether or not the opportunity has just been added to your matches).
But what’s more likely to move the needle for you are the various types of filters Instrumentl has under the “Filter” drop-down. These will help you narrow down your matches and find best-fit funders.
For now, just play around with filters to see how they affect the results you get. You can select more than one so do explore for a bit.
Tomorrow, you’ll take a deeper dive into the power of filters and start using your Grant Tracker!
Day 3: Save 5 funding opportunities to your tracker & assign tasks
Estimated time: 45 minutes
Theme: Jumpstart team collaboration 💪
Day 3 checklist:
Instrumentl glossary: A Funding Opportunity Match on Instrumentl refers to a funding opportunity with public information on the funder's website that has an open way to apply or submit an LOI. Funding Opportunity Matches can be from foundation, corporate, or government sources. All information you see in Instrumentl comes directly from the funder's website.
Step 1: Filter your opportunities
Remember how yesterday, you played around with different filters and explored how they change the grant opportunity results you see? Today is the time to actually use these filters to find 5 good-fit funding opportunities for your nonprofit!
Watch the video below for a closer look at how you can make the most out of your filters.
Step 2: Pick 5 funding opportunities & save them to the Tracker
Once you applied the filters, it’s time to pick five opportunities that seem like a good fit and save them to the Tracker.
Grant research typically works as a two-fold process:
- First you narrow down your opportunities by looking at eligibility criteria and an RFP in a glance
- Then you dig deeper by actually researching the opportunity and the funder to decide if you should pursue that grant
Here is a helpful list of questions to ask while taking a first pass and evaluating RFPs:
- What’s the grantmaker’s mission? Does it align to your initiatives?
- What are the specific goals of the grant RFP?
- Do you meet their eligibility requirements?
- What’s the size of grants being made?
- Does it align with your budget needs?
- What type of grant is this opportunity for?
Instrumentl makes it incredibly easy to answer these questions by providing a TL;DR for every RFP.
Get your cheatsheet here to quickly assess funding opportunities and separate the wheat from the chaff.
Once you decide you’d like to research the opportunity further, save it to your Tracker.
.png)
Pro tip: Before saving an opportunity to your Tracker, you can add a short note about it. This will help you prioritize further down the line.
.png)
The moment you click “Save”, you’ll be able to save the opportunity to one of your Projects and change the status of your opportunity. Since you’re just getting started, you can leave it to “Researching”.
.png)
Then click “Save” and bam–it’s in your Tracker now!
.png)
Nice work! Now go ahead and save another four opportunities following the same workflow.
Step 3: Assign tasks
Once you saved five opportunities to your Tracker, it’s time to assign tasks. Remember–teamwork makes the dream work.
Instrumentl serves as a single source of truth for everything related to your grants, so it has great project management capabilities as well. There are several ways you can create tasks. Let’s do it by clicking on the opportunity within the Tracker and then selecting “Tasks”.
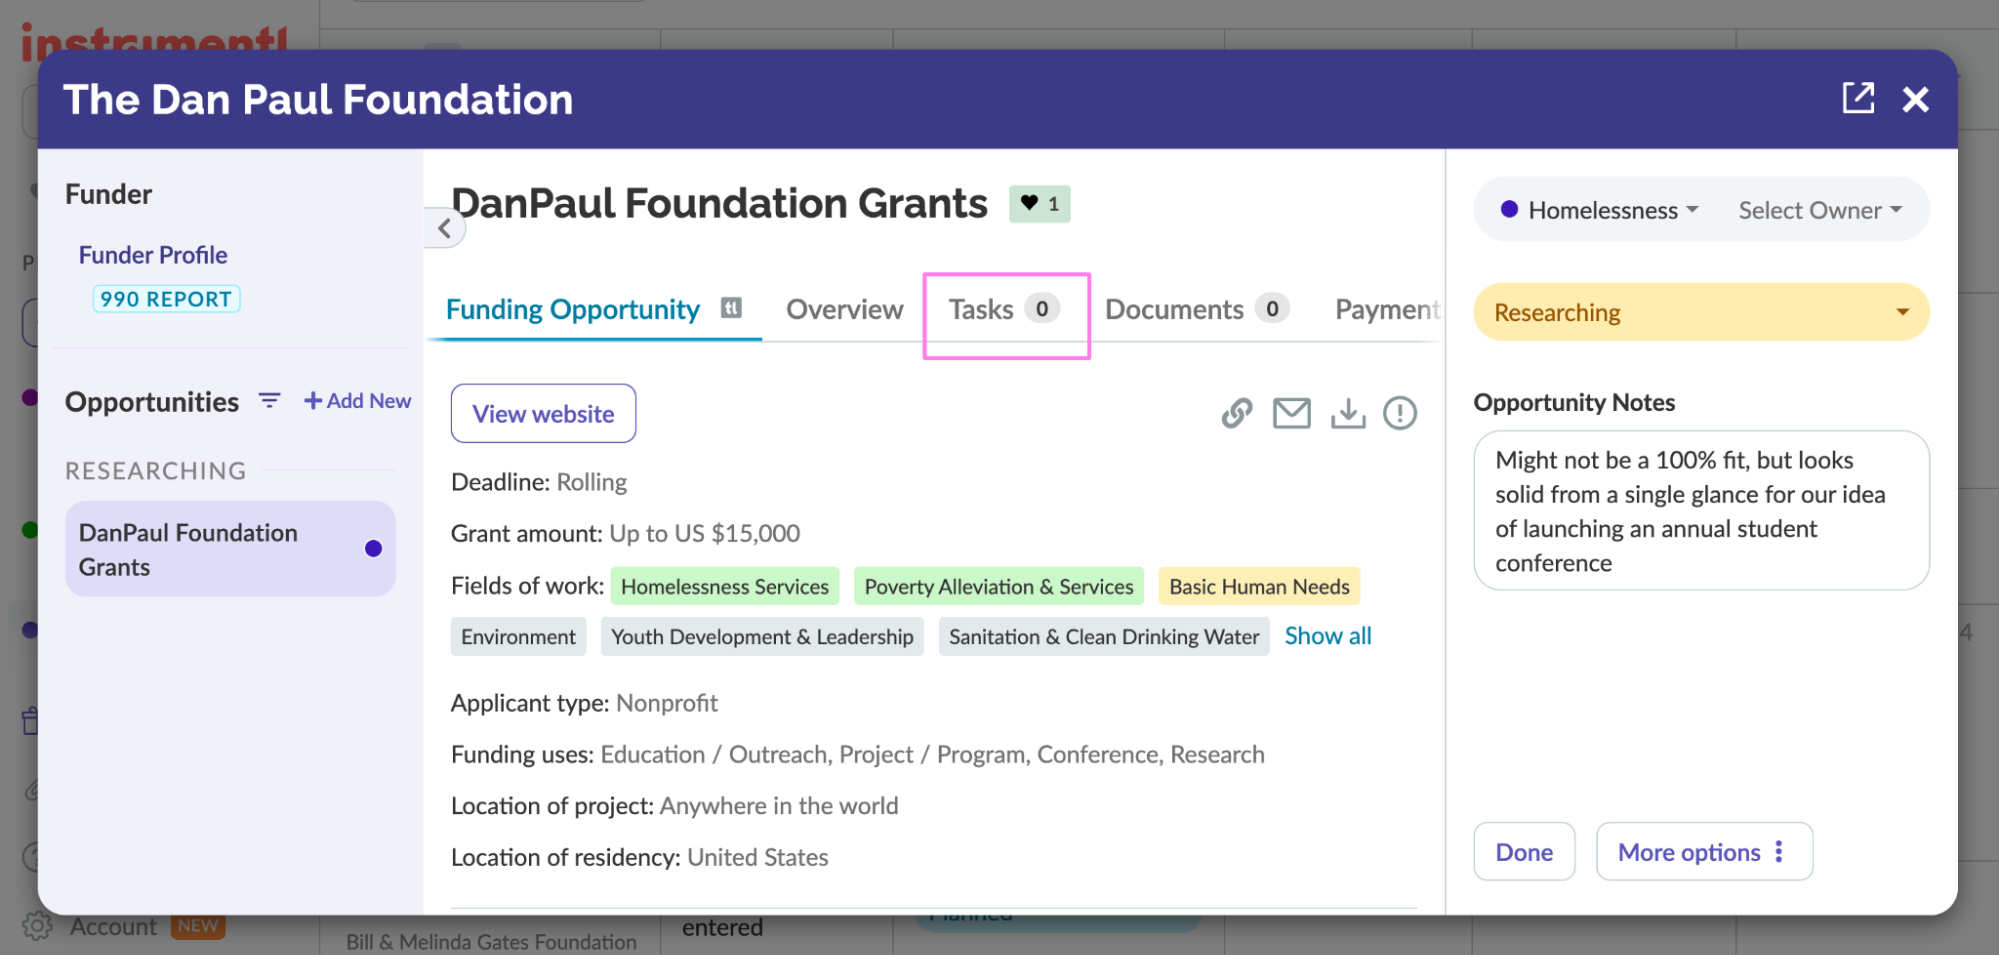
Once you click on “Tasks”, you’ll see a view that allows you to create a new task.
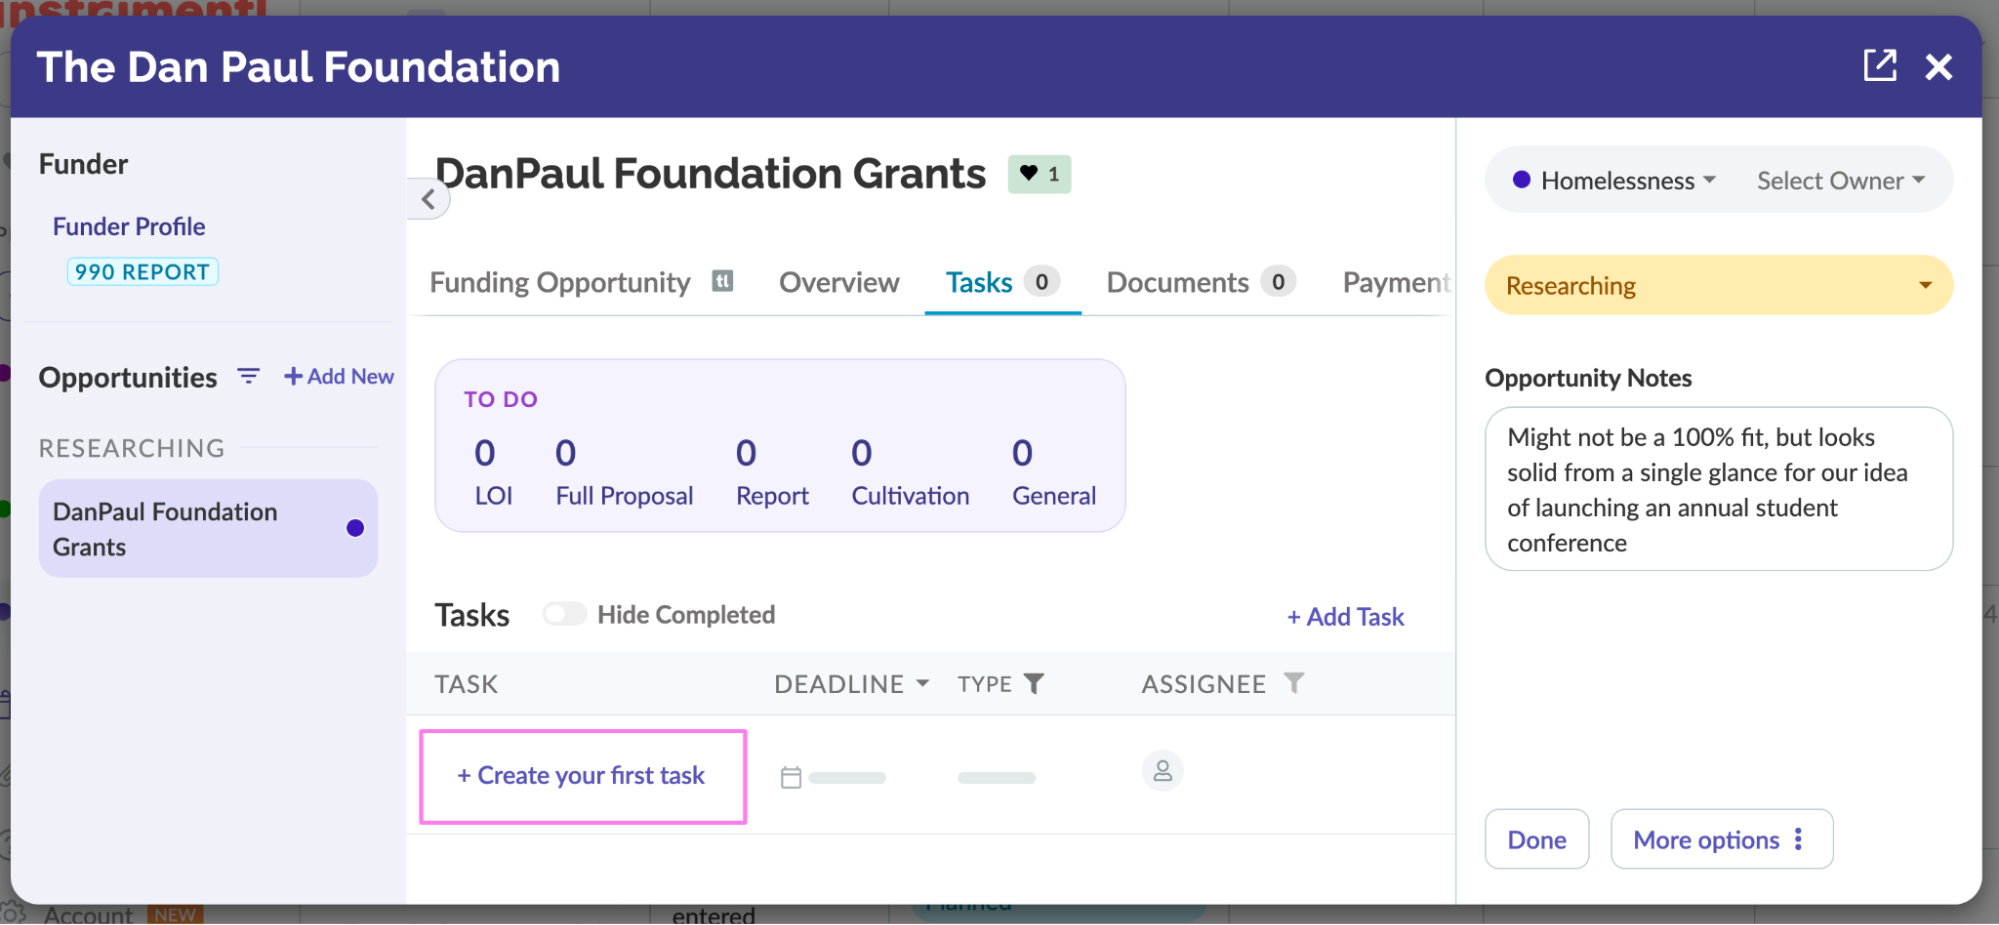
When you click on it, a drop-down will appear and you’ll be able to create your first task in seconds.
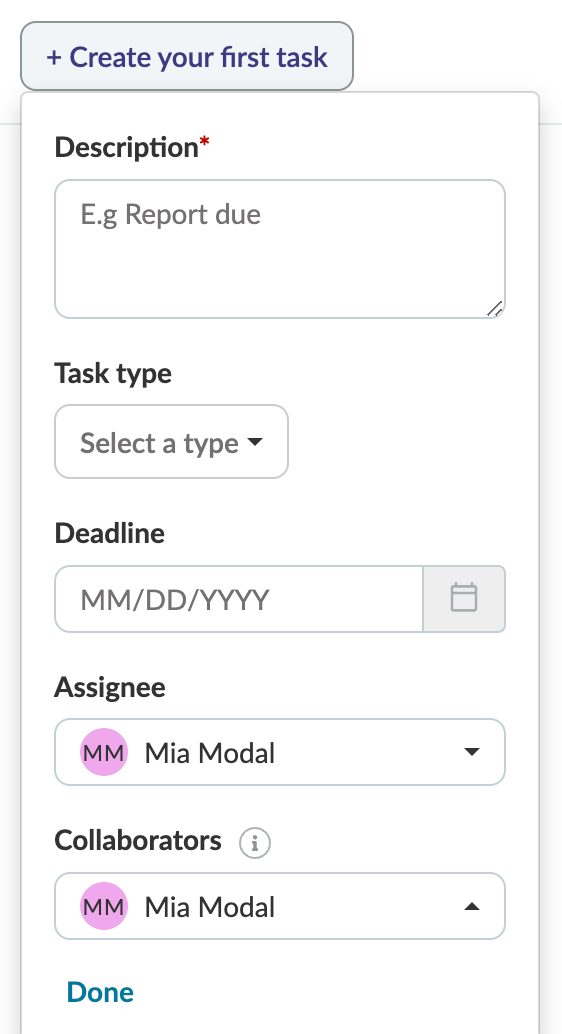
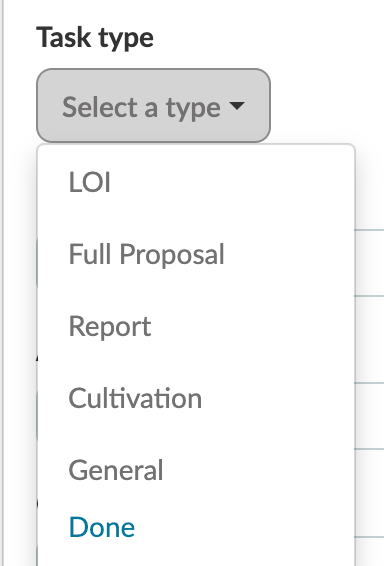
There are different Task types to choose from. Since you’re still in the Research phase, you can pick “General” for now.
Add a short task description, set the deadline, choose your Assignee and Collaborators, and click “Done”.
Congratulations! You have created your first task and assigned it to one of your team members.
Now do the same for the remaining four opportunities you have saved to your Tracker. Try to divide the workload equally. This will help you work through different RFPs faster.
Day 4: Take a deep dive into 990s for your 5 saved opportunities
Estimated time: 45 minutes
Theme: Learn how to act on data 📊
Day 4 checklist:
Instrumentl glossary: Instrumentl receives the 990 data directly from the IRS, then extracts key info, and creates visual summaries, so you don’t have to squint your eyes while looking at dozens of pages in a typical 990 PDF file.
You have your five opportunities saved. Based on your short evaluation, you concluded that there is alignment between the funder’s mission and your own. The grant amount looks good for your project.
Now is the time to take a deeper dive and understand if this is truly a good fit and more importantly–to estimate what would be your chances of getting that grant.
To make this easier for you, we have prepared a cheatsheet you can use to evaluate each funder.
Print your cheetsheat or have it nearby, and then check out how to make the most of 990s within Instrumentl by watching the video. Follow the outlined steps from the video.
Step 1: Review general giving trends and openness to new grantees
The first step would be to check the funder’s general giving trends.
When you open your opportunity from the Tracker, click on the “Funder Profile 990 Report”.
.png)
This will allow you to see all the key information about the funder.
.png)
As you scroll down, you’ll see different data on the funder–all extracted and nicely visualized from 990s.
%20(1).gif)
Within this first step, you should look at the general giving trends. For The Dan Paul Foundation we’re using in this example, Key Financial Stats graph looks like this:
.png)
So, what does the graph tell you?
When you hover over the chart, you’ll see total amounts given each year. In this case, the most amounts (a total of $135,377) were given in 2014. Since then, the amounts given were mostly decreasing, and finally reached a sum of $44,000 in 2021.
This may or may not be an indicator that this foundation doesn’t have the capacity to give to new grantees. However, it is vital to look at more than just the data points around total giving.
You need to connect the dots to understand the full picture and properly evaluate this funder. Keep going!
Analyze giving trends such as:
- Average grant amounts
- Median grant amounts
- The number of grants awarded
This will give you more accurate insight into the foundation’s priorities and their willingness to give to certain organizations, projects, or programs.
For this particular foundation, the average grant amount is little more than $4,000.
.png)
This is already telling you that this particular foundation typically supports smaller projects. And what about the number of grants they give per year?
Based on the graph, it seems like the number might be trending upwards once again. Looking at the past few years–the foundation is pretty consistent with the number of grants they give (10-15 per year).
Could this indicate that the competition is too big? Let’s check the Past Grantees report.
.gif)
By looking at the Past Grantees, you can see that some organizations receive funding year after year, meaning that this foundation might prioritize supporting repeated grantees.
Is it truly a good fit for your organization then? It could be, but you probably don’t want to prioritize it.
Gather the facts and then take a step back to understand what the data’s telling you:
- The grant amounts from this particular foundation are not that big and they are not increasing over time
- The number of grants given per year is not increasing
- There are a lot of repeated grantees, meaning that for a relatively small amount of grants available, there’s already a lot of competition
It takes time to write an LOI, not to mention an entire grant proposal. This is why you should pick your battles wisely.
💡 Did you know? If there is a sufficient amount of data, Instrumentl will also show you visual summaries that indicate openess to new grantees, making it even easier to understand your chances better. This is another valuable data point for you when evaluating whether or not you should actually go after that grant opportunity. See example below for the Ford Foundation.
.gif)
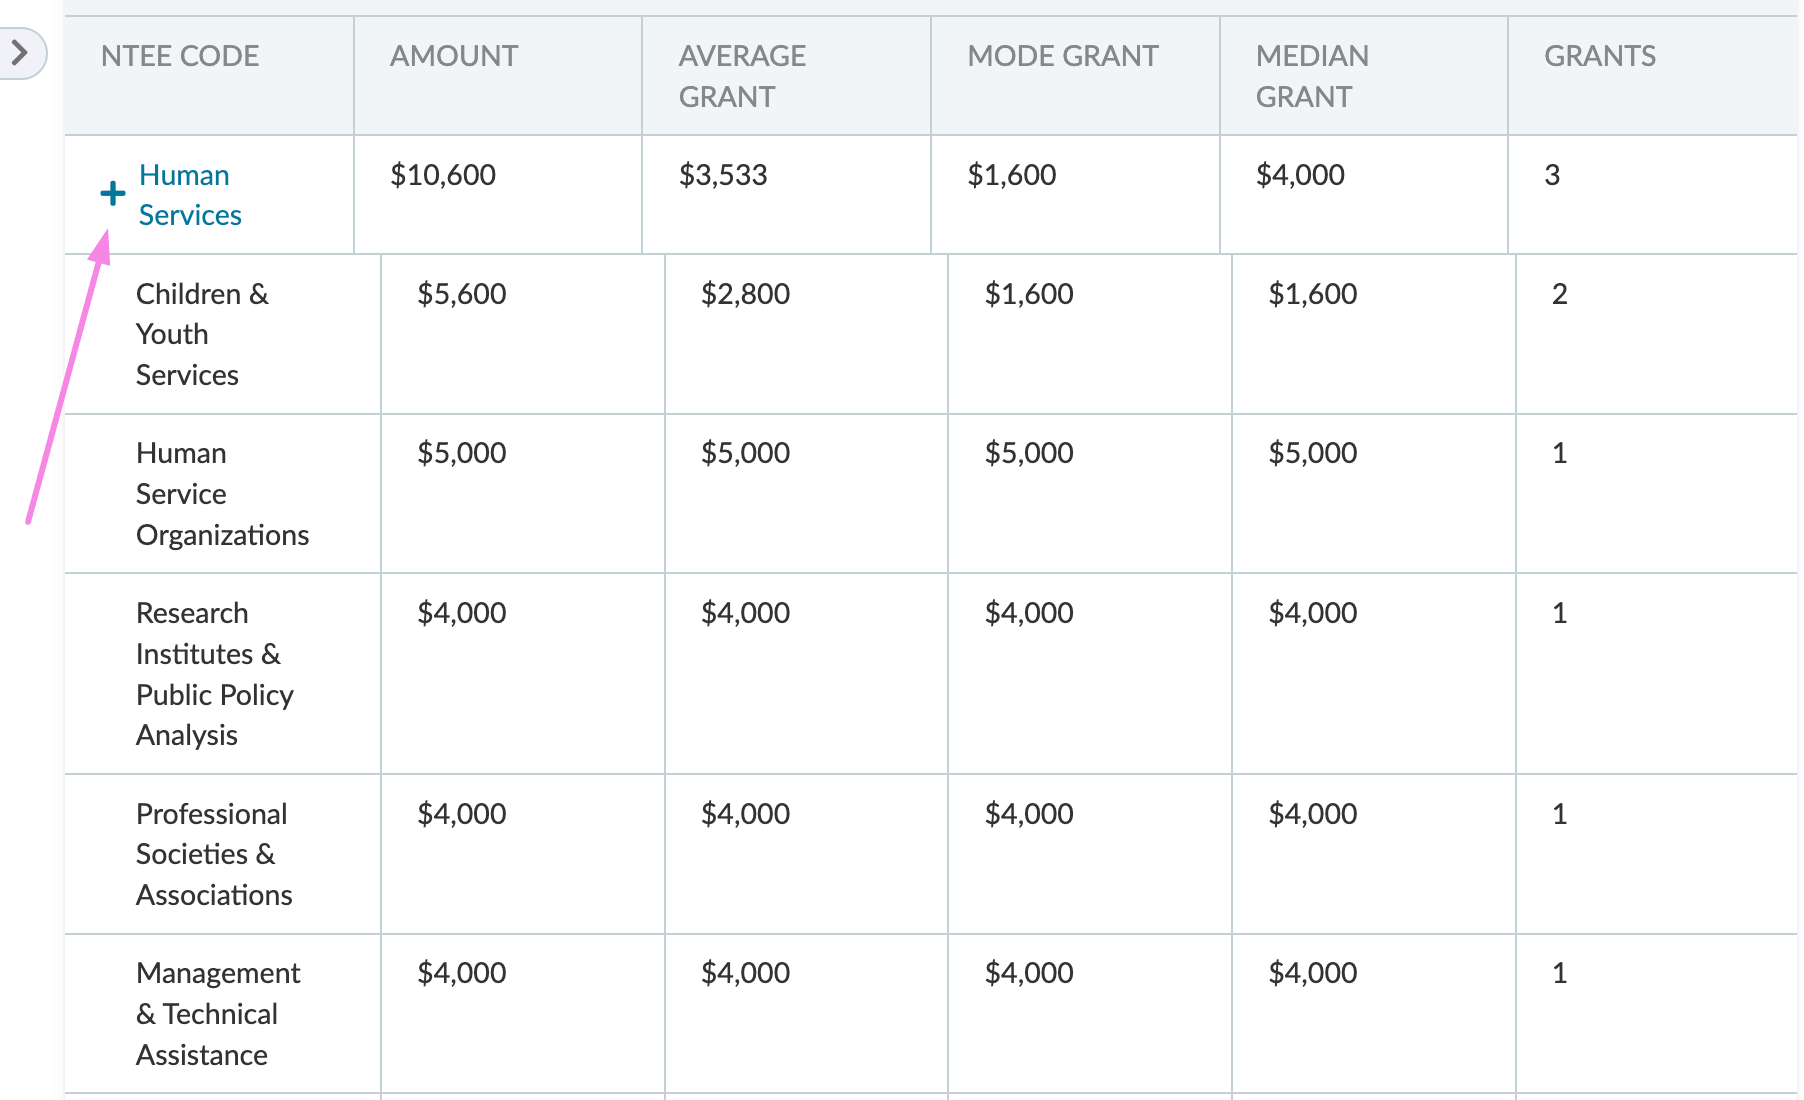
Step 2: Check funding by NTEE code
Another great way to evaluate whether or not a funder is a good fit is by looking at the history of giving broken down by categories (NTEE codes). If you don’t see your NTEE high on their priority list, then it might not be worth the effort.
You can learn even more by analyzing NTEE subcategories. For example, a category like Human Services is very broad and only gives us general insight to the types of organizations that this foundation aims to give to.
Subcategories can help you determine if your specific project really aligns with the foundation’s giving priorities. Simply click on the “+” sign to discover the subcategories.
Step 3: Fill out the worksheet to evaluate each funder
Now that you’ve learned more about each individual funder, it’s time to evaluate whether or not the opportunity is worth pursuing. Fill out the worksheet and critically assess if it makes sense to go for it or not!
Day 5: Find 5 new invite-only funders who are a good fit for your program
Estimated time: 45 minutes
Theme: Put new funders on your radar 🔎
Instrumentl glossary: A Funder Match on Instrumentl refers to a funder that submits 990s or doesn't have a website and an open way to apply or submit an LOI. Information about Funder Matches comes directly from the funder's 990 filings, and not from their website or the Instrumentl team.
Day 5 checklist:
Step 1: Watch our 4-minute video to learn how to find invite-only funders
Follow the instructions in the video shared by Amélie to discover invite-only funders in Instrumentl.
With a simple filter search, you’ll be able to find even those funders that are “off the radar”, meaning that they might not have a website at all.
.png)
Step 2: Save 5 invite-only funders to your Tracker & assign tasks to your teammates
It’s day five of your Instrumentl free trial, so this isn’t your first rodeo when it comes to saving things to your Tracker.
You know the drill–if you assess that the funder might be a good fit for your organization, save it to your Tracker so that you can continue your research.
Make sure to add notes to your saved search, especially if it’s something that can be a game-changer for your org:
.png)
Once you add a task within the opportunity, select either “General” or “Cultivation” as task type, just to make it clear that you’re exploring building relationships with people from the foundation.
.png)
Step 3: Add data to the funder profile & start building funder history
The neat thing about Instrumentl is that it allows you to centralize all information on the history of your relationship with the funder, in one place. That’s what we call Funder History.
It’s a dedicated view that consolidates all essential funder information, from key contacts to application history, in one convenient location, simplifying your grant-seeking journey.
To access the Funder Profile, go to your Tracker and use the search bar to find the invite-only funder you previously saved. Then click on the opportunity.
.png)
Once you open the opportunity, click on the “Funder Profile” on your left-hand side.
.png)
From here, you’ll be able to see everything about this funder–including contact information and key people working there.
This is where it gets interesting! In case you know someone from the foundation, add their contacts to the profile. If not, check the available contact information and start doing your research.
.png)
The hidden gem of the Funder Profile?
Drumroll, please…
It’s the Past Grantees report!
To be fair, Past Grantees report exists within every funder profile in Instrumentl–it’s not exclusively tied to invite-only funders.
However, this report is especially useful when evaluating invite-only funders. And it’s literally within a scroll inside the Funder Profile.
.gif)
So, why is this useful? For one, you can see if there are organizations on the list of past recipients similar to yours, and validate that this particular funder has an interest in supporting your mission. But the second reason might be more intriguing.
Are you aware of the “Six degrees of separation” theory? It suggests that all people are six or fewer social connections away from each other. In other words, any two people can get connected in a maximum of six steps.
If you carefully sift through the list of past recipients, you might discover that you know somebody from the organizations that were previously funded. Or maybe you don’t know them directly, but a friend knows a friend who knows a friend… You get what we’re aiming for, right?
The idea is that you can leverage this data within Instrumentl to build meaningful connections and relationships, and get to the point where you’ll get an introduction to the funder.
Adding contacts and notes to your Funder Profile is how you start building historical data, and those first milestones are always exciting.
.png)
Further reading: Check out this resource on how to get noticed by invite-only funders.
Day 6: Reverse search & see what funders are giving to similar organizations in your area
Estimated time: 30 minutes
Theme: Add more relevant funders to your list 🤓
Day 6 checklist:
Instrumentl glossary: Recipient Profiles allow you to discover nonprofits similar to yours and explore their funding sources, accelerating your search for the right funders.
Step 1: Watch our 5-minute video about recipient profiles
In just a few minutes, you’ll learn:
- How to look up recipient profiles
- How to review the past awards a nonprofit received
- How to review a funder's active opportunities
- How to review a funder without any active opportunities
…and more!
Step 2: Save 3 new funders to your Tracker & assign tasks
Now that you followed the instructions from the video, it’s time to save three funders that seem like a potential good-fit to your Tracker.
So, let’s say that I followed Amélie’s instructions in the video and that I found this past recipient that has a similar mission to my nonprofit organization. I will click on “Past Awards Received”.
.png)
From there, I’ll be able to see all the previous funders that have supported this organization.
.png)
I will then click on the name of the foundation to learn more about it.
Let’s say that I’m interested in Delaplaine Foundation. I’ll click on it and then see comprehensive data about this foundation, along with any active opportunities.
.png)
I can then review the active RFP and study through all the funder data (just like on day 4 of my Instrumentl free trial). If it looks like a potential good fit, I can click on “+Add New”.
.png)
Once I click on that, I’ll have an option to either save the opportunity or the funder to my Tracker.
.png)
Because I’m now interested in exploring the funder as a whole, I will add them to my Tracker.
The process is the same as before. You already know the drill. Easy-peasy!
.png)
The moment you click “Save”, a new window will open. It’s the funder opportunity you just saved! Make sure to add a task to yourself or to your team member from the very start.
.png)
Repeat this reverse-search process twice more to add new funders to your Grant Tracker.
Step 3: Loop in people outside of Instrumentl
Do you have team members who are not direct users of Instrumentl but still–you do discuss potential opportunities with them? There’s no reason to exclude them from the conversation, especially if they help with the decision-making process.
The platform makes it easy for you to share different opportunities with non-Instrumentl users, so give it a try!
Click on the opportunity you’d like to share with your team member, and then click on the arrow in the right-hand corner to expand the view.
.png)
Once you click on it, you will encounter this view. Right below the name of the foundation, there is a “Share” button and a button with an arrow pointing downwards.
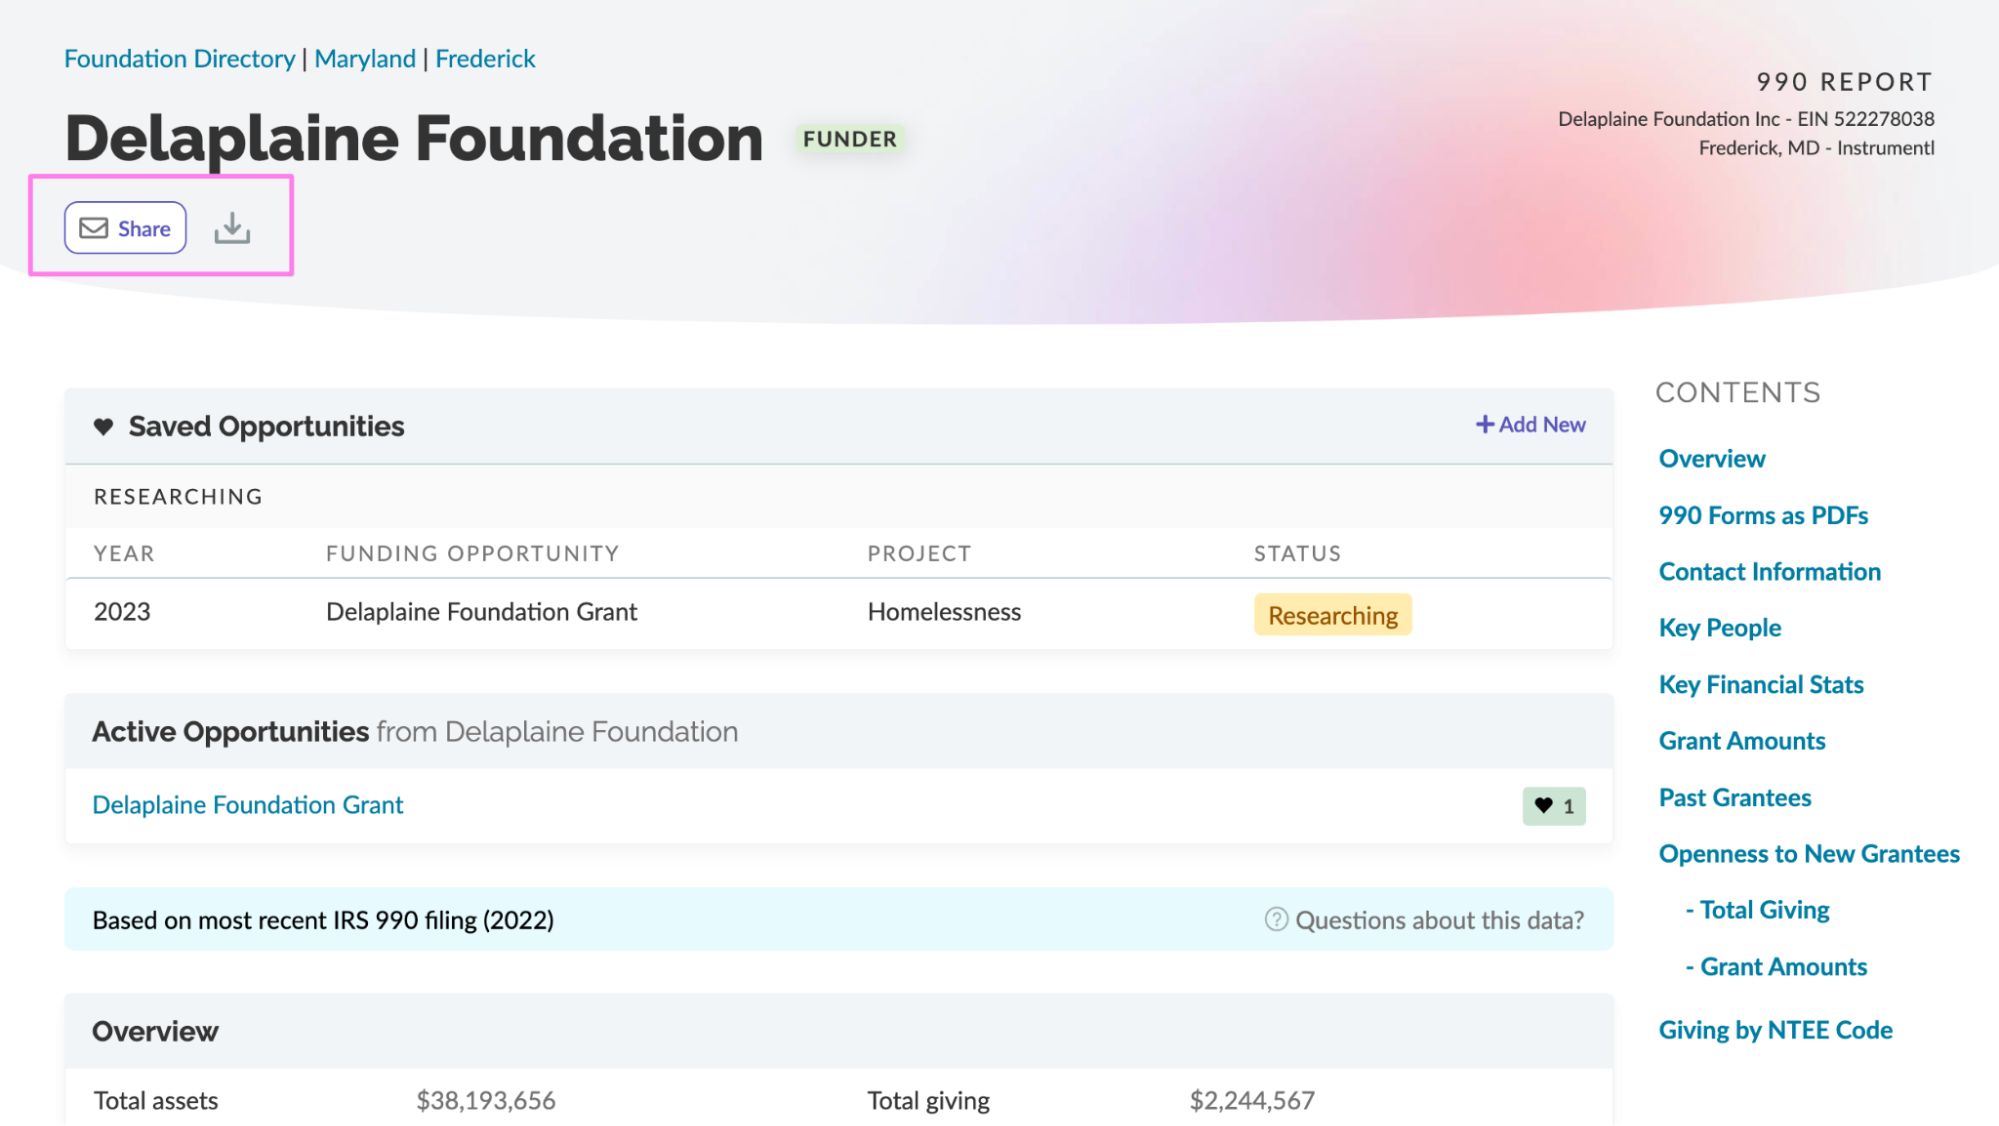
If you click on “Share”, you will be able to forward this view to any person, regardless of whether they are using Instrumentl or not.
.png)
Pretty neat, right? Another option you have is to click on the download button and export the PDF of the opportunity. Then you can have a meaningful discussion in your next meeting or compare different funding options together.
Day 7: Add your organization’s docs to the Documents Library
Estimated time: 30 minutes
Theme: Stay organized & keep everyone on the same page 💯
Instrumentl glossary: Instrumentl’s Document Library helps you keep all your grant documents stored, organized, and easily accessible in one place so your team has a single source of truth. Store documents like budgets, final proposals, executive summaries, common answers, board lists, and anything else that you’d like to keep accessible for you and your team.
Day 7 checklist:
Step 1: Add your key documents to the Document Library
You probably have documents related to grants in different places. Whether they are locally stored on your computer or live in different external tools, they are scattered and it’s not very efficient. How about centralizing everything in one place?
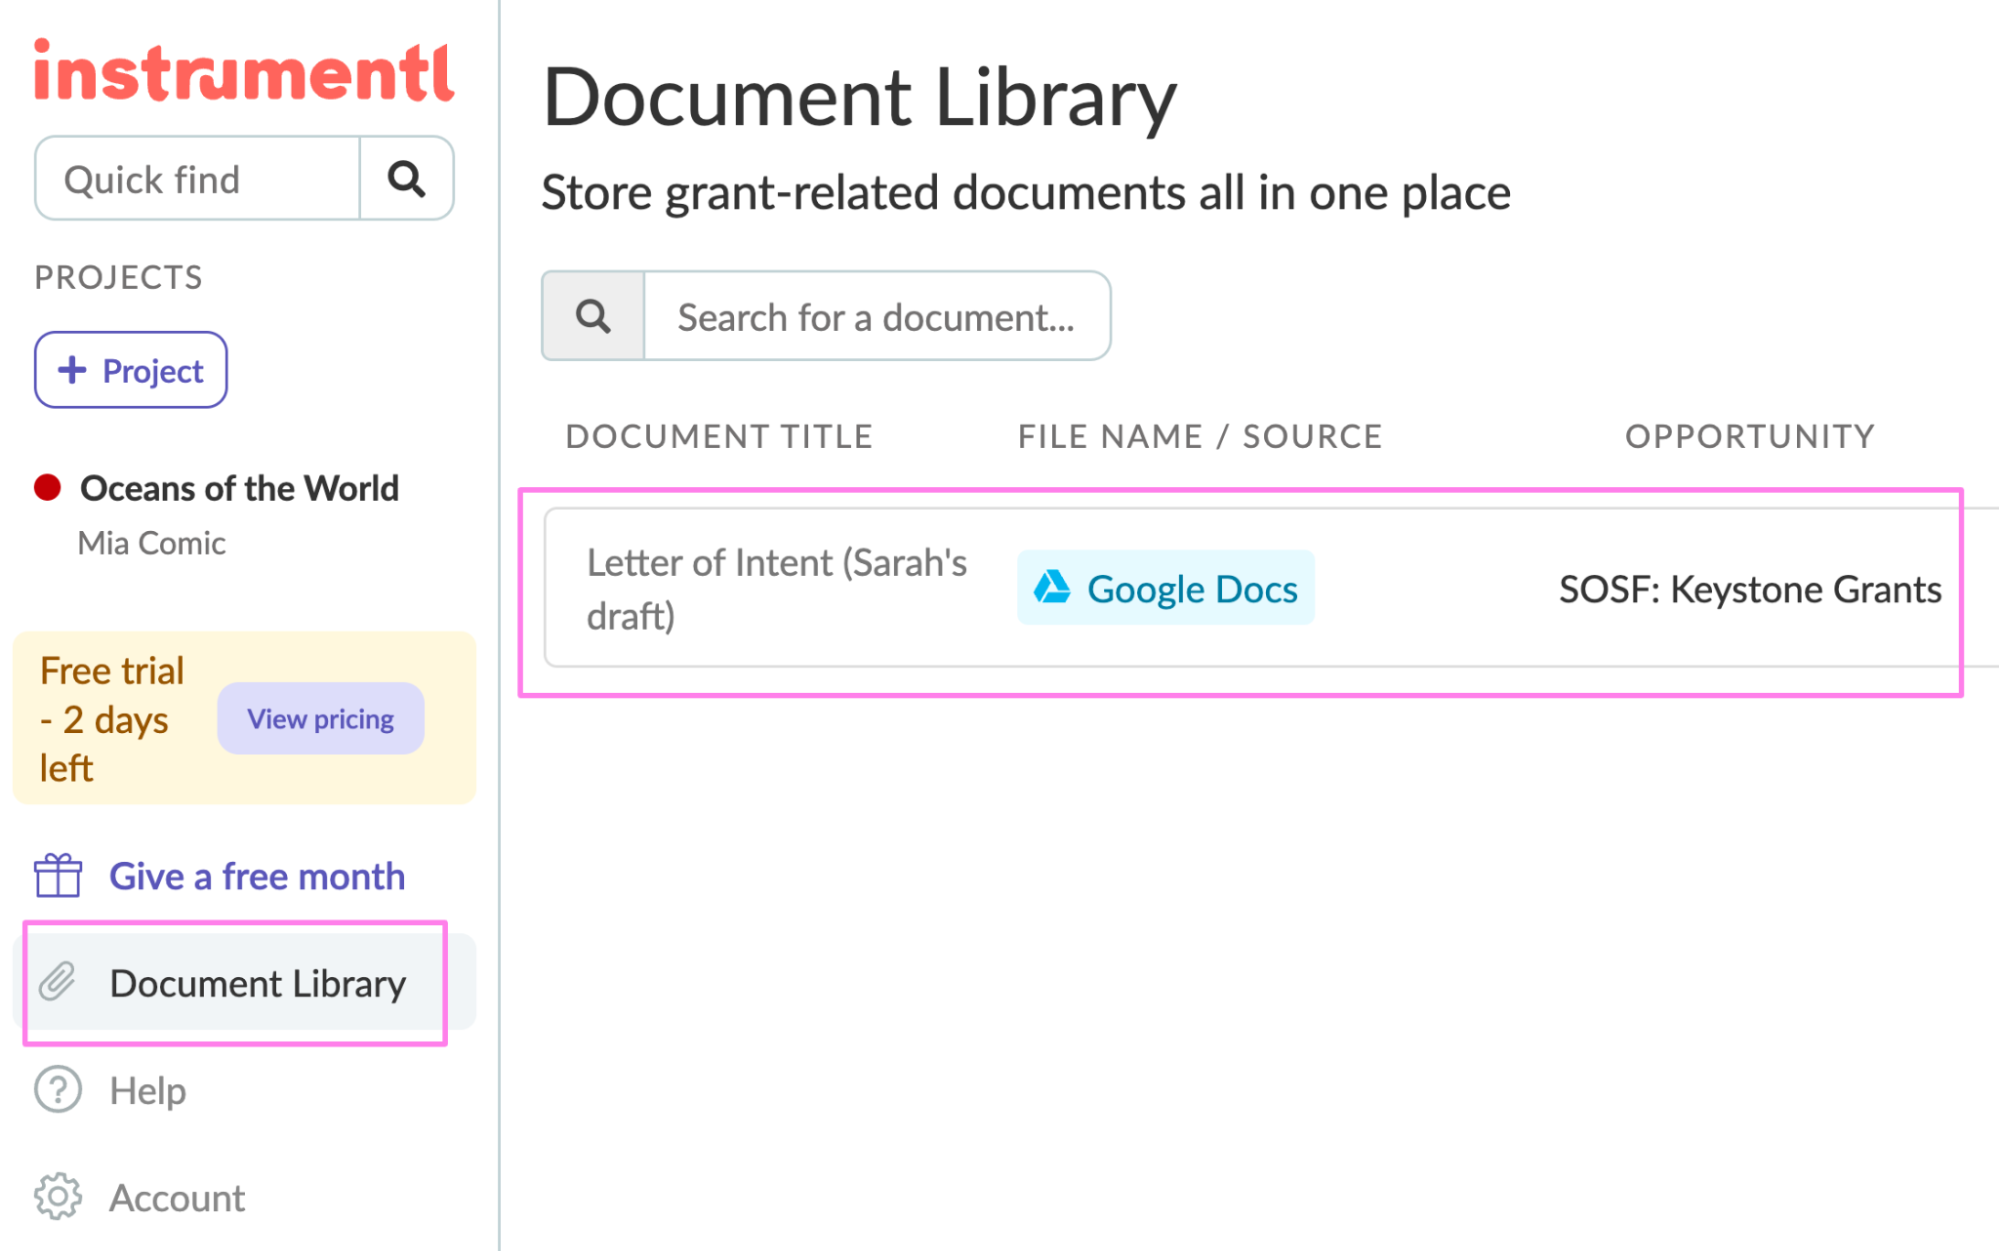
Access your Document Library from the main view by clicking on the “Document Library” in the lower left corner.
.png)
Once you click there, you’ll be able to upload a document of any format to your library.
.png)
When you click on “+Add Document”, you’ll be able to either upload documents or to add a link to a shared file.
.png)
For starters, try uploading any type of file from your computer.
Did you do it? Congrats! You have started building your single source of truth for grants.
Step 2: Try adding external links to the library
So, why are links to shared files useful? How do they work? Let’s see how they look in a populated Instrumentl account.
When you add a link, Instrumentl will automatically identify file name and source, making it easier for everyone to scan through the library.
.png)
If you’re struggling with information fragmentation in your nonprofit, it’s more convenient to just add a link to this central document database as opposed to downloading documents from your Google Drive, for example, and then reuploading them to Instrumentl.
💡 Did you know? Research shows that on average, we waste between 2-5 hours per week searching for documents we need. The Document Library saves you time and effort, making all grant-related docs immediately accessible.
As you can see, your central grants documents library shows document title, file name/source, and the opportunity to which the document belongs. There’s also a date when the document was added.
When you gradually start populating your Document Library, you’ll be able to add general documents (e.g. general information about your organization that’s easy to copy and paste, templates for LOIs). These don’t necessarily need to be tied to any specific opportunity.
However, if you’re adding a document that’s relevant to a specific opportunity (e.g. LOI you want to send to a specific funder), it makes sense to add it within your opportunity.
Step 3: Add documents to specific opportunities you saved to your Tracker
Here’s how you can add documents to your specific opportunities.
Go to your Tracker and click on the opportunity you want to add a document to.
.png)
Once you open the Opportunity view, you’ll see “Documents” within the tab.
.png)
Click on “Documents”. Then click on “+Add documents”.
.png)
When you click on “+Add Documents”, you’ll be able to upload documents or share links to external docs.
.png)
Let’s say you want to add a Google Drive link to the Document Library within this specific opportunity. Paste the link in the "URL" box and name your document.
.png)
When you click “Done”, the document will be saved within the Opportunity. The source will also be displayed.
.png)
Now, when you go back to your Document Library for the entire project, you’ll see it there, along with the opportunity it’s tied to.
To summarize: whenever you attach a document to a specific opportunity on Instrumentl, it will also be synced into your Document Library automatically.
So there you have it–all your documents, neatly stored in one place.
Day 8: Divide ownership and change the statuses of your grants
Estimated time: 15 minutes
Theme: Know who’s doing what & gain control over your pipeline 😉
Day 8 checklist:
Instrumentl glossary: The Calendar View centralizes crucial deadlines, from tasks to funder deadlines, ensuring your team stays on track. Tailor your view by project, task assignee, task type, grant owner, and submission deadline.
Step 1: Select the owner for each grant opportunity you saved
Consider selecting a dedicated owner for each grant opportunity you’re researching. You can do so by navigating to the upper right-hand corner within the opportunity
.png)
.png)
Why is this useful? Well, as you roll up your sleeves and start digging through more and more opportunities, it will become increasingly important to know who’s doing what.
Having a single person who owns the opportunity means that you’re managing accountability within your organization and introducing transparency to your grant management.
It doesn’t necessarily mean that you have a single person doing everything related to that grant, but more like a single point of contact or a “project manager” that ensures you’re on track for that specific grant.
Now go on and select the owner for each grant opportunity you saved to your Tracker!
Step 2: Change statuses of your grants
Status selections help you gain clarity on which stage of the application process you are currently in. This makes your grant tracking easier and more precise.
Here are the available statuses in Instrumentl:
.png)
Each status is pretty self-explanatory, but you can also check out how we recommend using them.
We worked to refine statuses by listening to feedback from users. It’s very important for each status to clearly reflect the current phase of the grant.
As you start building your Tracker, you’ll begin to realize how convenient it is to understand where you’re at with each opportunity. Different colors make it even easier.
Try changing the status of the grant opportunities you saved. In most cases, once you are done researching, it’s logical to change the status to either “Planned” or to “Abandoned”.
If you assess it’s a good-fit, go ahead and select “Planned” from the dropdown. You’re planning to pursue that grant! Nice.
If you think it’s not worthy of your time and you want to skip it, change the status to “Abandoned”.
💡 Pro tip: The biggest difference between removing a grant from your Tracker completely vs. marking it as "Abandoned" is whether you want to continue receiving email notifications about that grant's future deadlines. The "Abandoned" status should be used if you might reconsider applying to this grant in the future.
Step 3: Explore the Calendar View
The Calendar View in Instrumentl centralizes important deadlines in one place–everything from tasks to funder deadlines, you name it.
You can access the Calendar View by clicking on “Calendar” in the top navigation bar.
.png)
When you open the “Calendar View”, you’ll see there is a filtering option. You can tailor the view by project, task assignee, task type, grant owner, and submission deadline.
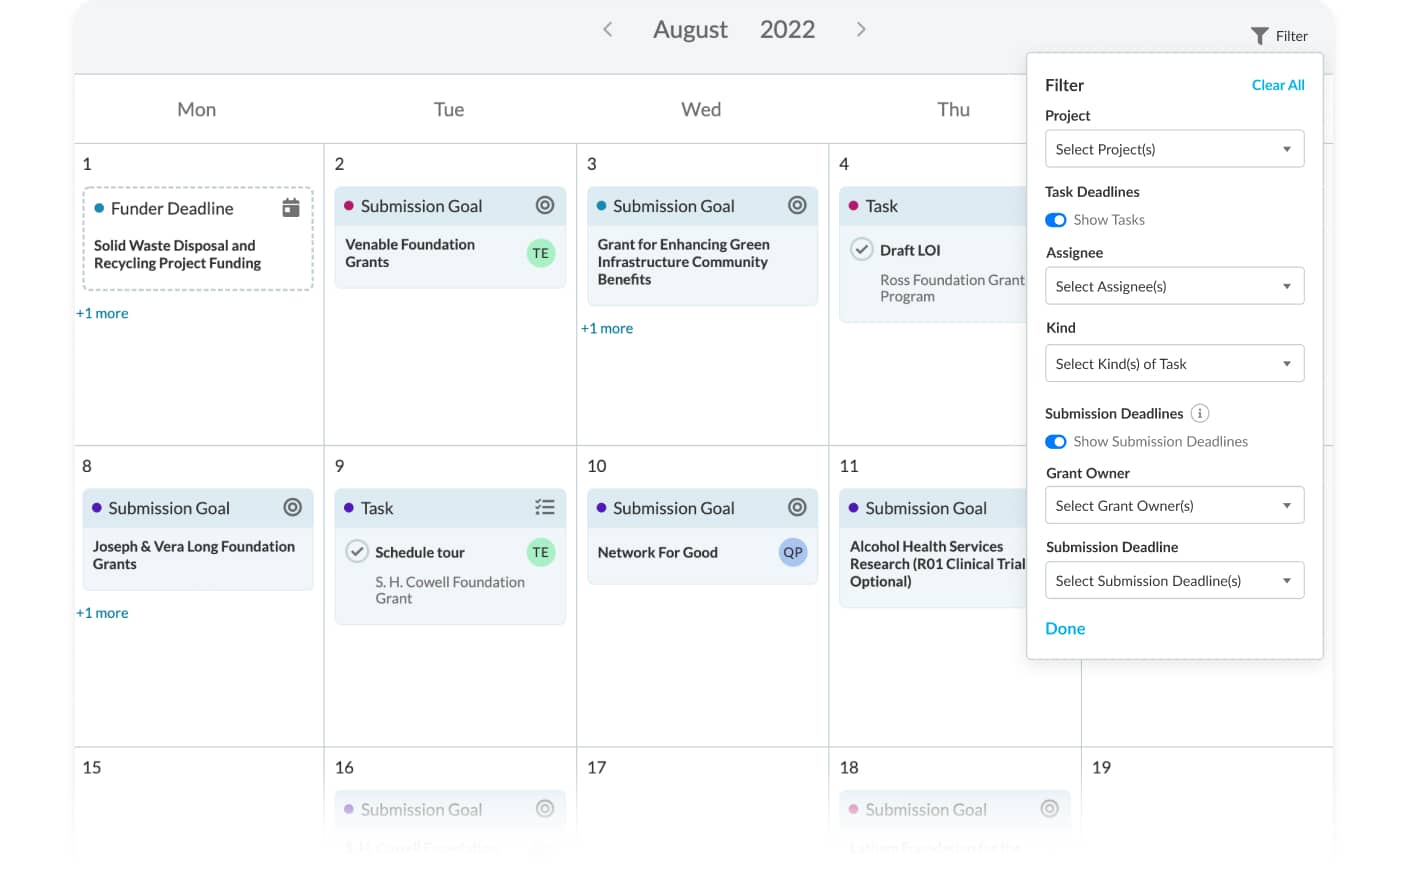
If you added very few funders and opportunities to your Tracker, and didn’t assign that many tasks, your calendar will look less populated than in the visual above.
Nonetheless, the calendar is a very useful tool for grant managers. Most of us are already accustomed to relying on calendar apps and taking notes on our smartphones. But the larger the number of tools you use to get something done, the poorer your productivity.
The Calendar View enables you to focus. That’s what you need as a grant professional. Clearly set your priorities, ensure your team stays on track, and get a sense of the health of your grant pipeline.
Imagine starting your team meetings by looking at the calendar and doing a quick status report on the opportunities. It’s the clarity you can’t get with spreadsheets or by chasing documents across email threads.
The meeting agenda basically forms on its own–all it takes is a single glance for you to know what needs to be your next step.
Another great thing about the Calendar View is that you can easily access your funding opportunity by clicking directly on the event. This means you won’t have to spend time going back to your Tracker and finding the funding opportunity–it’s all in one place!
.gif)
Day 9: Create a calendar link for one of your opportunities & add it to your work calendar
Estimated time: 15 minutes
Theme: Stay on top of your work & never miss a deadline 📅
Day 9 checklist:
Instrumentl glossary: Calendar integration enables you to stay on top of tasks and grant deadlines, with automatic updates as changes occur. You can customize your calendar by project, status, submission type, and grant owner, and share it with your team. Compatible with Outlook, Google Calendar, and iCal.
Step 1: Integrate your external calendar with Instrumentl
Most of us are used to looking at digital calendars to organize our work days. To make sure you never miss a beat, you can view your funding opportunity deadlines in a web calendar outside of Instrumentl. All thanks to the Calendar Integration.
.png)
We'll keep your external calendar up-to-date with Task Deadlines, Submission Goals, Submission Dates, and Funder Deadlines. Any changes made on Instrumentl will be reflected on your external calendar.
- Follow these steps to set up your Google Calendar Integration
- Follow these steps to set up your Apple Calendar integration
- Follow these steps to set up your Outlook Calendar integration
Once you’re done setting up your chosen calendar integration, move on to the next step!
Step 2: Create a custom calendar link
Custom calendar links in Instrumentl ensure you get a decluttered and focused view in your external calendar. Maybe you'd only like your Instrumentl Tasks to be synced to your external calendar, or maybe you're only interested in seeing deadlines for the projects you lead.
Either way, with custom calendar links, you cancel out the noise and stay in the loop with deadlines that matter to you.
Navigate to your Calendar View, and then click on “Share Calendar” in the top right corner.
.png)
Once you click on “Share Calendar”, click on “Customize”.
.png)
When you click “Customize”, a page called “Calendar Integrations” will appear.
.png)
From there, click on “+ Add a Calendar Link”. You'll be able to customize the types of deadlines to appear on that specific calendar link.
.png)
Once finished, you can copy the calendar link and integrate this with an external web calendar. The calendar name you select will be the name of the calendar in your third party calendar client.
There are two main benefits to using custom calendar links:
- You can create a calendar link specific to whatever use case you care about, e.g. a calendar link just for your reports, or a calendar link for a specific project that you can share with an external team member
- You can now help your broader team stay up to date with important deadlines, relevant to them, without needing them to have an Instrumentl account or login to Instrumentl
…and this brings us to step 3.
Step 3: Share you calendar link with an external team member
Do you have an external team member who’s not using Instrumentl, but is still participating in decision-making or has an advisory role? It’s easy to keep them in the loop.
Create a custom calendar link, copy it, and share it with people outside of Instrumentl.
.png)
Some examples of calendars you could create:
- Calendar with just reporting deadlines
- Calendar with just opportunity submission deadlines
- Calendar with all deadlines specific to a single project
- Calendar with all submission and task deadlines relevant to a specific user
This is also useful for effectively working with departments that don’t directly participate in grant work themselves, but still play a key role within their domain of expertise (e.g. Finance Department).
Day 10: Move 1 grant to awarded status to explore post-award grant management features
Estimated time: 10 minutes
Theme: Imagine you already won that grant 🏆
Day 10 checklist:
Instrumentl glossary: Awards View enables you to efficiently manage your awarded grants. You can easily keep track of your grant disbursements and reimbursements or see all your awarded grants in one place.
Step 1: Change status to “Awarded-Active”
You made it to your tenth day of Instrumentl trial! That’s amazing. Now is the time to explore post-award management features.
Instrumentl aspires to be the most robust grant management software for grant professionals. The platform enables easier grant collaboration & improves visibility across all phases of the grants lifecycle, including post-award.
💡 Did you know? Instrumentl’s founders are just like you! They have years of personal and professional experience in the nonprofit and academic arenas. In 2014, the team came together to create the most comprehensive source of grant and funder data in the world, and designed it around the needs of the grants community.
Even though you’re not going to secure a grant during your 14-day trial (if only it were that easy!), it’s important to play around in Instrumentl to fully understand the value you’d get.
You’ll be able to see all of your awarded grants in one place by clicking into the Awards tab.
.png)
Try to change the status of one of your saved grant opportunities to “Awarded-Active”.
Navigate to the Tracker. Then change the status to “Awarded-Active”.
.png)
Once you change the status, you’ll get the opportunity to add more details about the awarded grant.
.png)
Feel free to make things up here and add some dummy data, just for the sake of familiarizing yourself with this part of the platform. Then click “Save”.
.png)
The moment you hit “Save”, the Awards Overview will get updated.
.png)
When you click on “Awards”, you’ll open the Awards View. This is a dedicated space for all your awarded grants (both active and closed).
.png)
Let’s zoom in a bit to understand what you can see here. To help you fully grasp the value of this, we’ll show you what the Awards View looks like when you’re already tracking multiple awarded grants.
.gif)
Here you can see:
- Total awarded amount, along with the number of awarded grants
- Payments (received vs. expected) presented in $ amounts and percentages
- Breakdown of funder types
- Next report due date
- Tasks that are due in the current month
This is very useful for understanding the state of your grants pipeline in a single glance.
Step 2: Edit your Goal
Within your Tracker, you’ll notice there is a section called Goal. Click on “Edit”.
.png)
Once you click “Edit”, you’ll be able to add the amounts you want to receive through grants and meaningfully work toward reaching them.
.png)
The Goal you set will be visible at all times at the top, whether you’re viewing it from the main Tracker view or through filtered views (opportunities that you’re researching or those that are currently in the application phase). This is how you can keep your eyes on the prize.

As you can see, in the Applications view, you can immediately grasp the current status of your grants, making it easier to see how far you are from reaching the goal.
.png)
Goal setting is a convenient way to meaningfully search for good-fit opportunities. It helps you stay focused and implies that you have a project in mind that you need to secure funding for.
Many nonprofit organizations struggle with survival which is why they may not have a particular project in mind when searching for funding. It’s more of adjusting to RFPs and then brainstorming a project.
In general, because of capacity issues, many grant professionals are finding it difficult to stop being reactive when it comes to grantseeking.
The good news is that, with over 15,000 live grant opportunities and more than 400,000 funders in Instrumentl’s database, you can effectively start flipping the narrative and become more strategic about securing funding.
Day 11: Add anticipated payments for that awarded grant
Estimated time: 10 minutes
Theme: Practice the power of self-fulfilling prophecy 💰
Day 11 checklist:
Instrumentl glossary: Payments Tracking empowers you to quickly visualize and monitor the inflow of funds for awarded grants, whether they arrive in installments or lump sums.
Step 1: Add payments to your awarded grant
Just like yesterday, today we’re going to play pretend so that you can experience post-award grant management in Instrumentl. And why not–let’s practice the power of self-fulfilling prophecy and manifest getting the funds!
Instrumentl introduced Payments Tracking to solve for a real problem grant professionals are facing.
Often, grant money comes in disbursements or reimbursements where we get parts of the overall grant amount over time. Sometimes it's hard to ensure your spending aligns with the grant payment schedule and to know when to reach out to nudge funders if payments aren't received on time.
What we learned by talking to hundreds of grant professionals is that they use a spreadsheet to track when each payment will come in. However, this makes it hard to understand aggregate cash flow and to use that information year over year. Plus, it’s hard to share the spreadsheet with others (e.g. Programs folks) to keep them informed.
Here’s how you can add payments to your awarded grant.
Start by clicking on the opportunity in your Tracker for which you changed the status to “Awarded-Active” yesterday.
.png)
By clicking on it, you will open the Opportunity View.
.png)
From there, navigate to “Payments” on the right side of the top navigation bar and click on it.
.png)
Once you click on it, you will see the Payments Tracker. Click on “+Add Payment”.
.png)
Once you click on "+Add Payment", you'll be able to add expected payments. Add the date you’re expecting to receive a payment, date you actually received it, and the amount.
.gif)
Now let’s pretend that you actually received the payment three weeks in advance (ha, we know this sounds surreal, but bear with us).
.png)
When you mark the date you received the payment, it will also be shown in the Payments Tracker within the Awards View. Let’s go and check.
There it is! When you hover over the progress bar, you will see the amount you received so far.
.png)
As you build your Payments Tracker, you’ll notice how this visual overview becomes more useful. Let’s give it a go.
.gif)
Now let’s go back to the Awards View and see what the Payments overview says.
.gif)
As you can see, the bar shows the total percentage of received payments and the remaining that you’re still waiting to receive. When you hover over it, you can see the exact $ amounts.
This can serve as a visual cue or a reminder to check what were the deadlines for payments, and to ensure you’re in communication with the funders if they are late.
Step 2: Leave notes about each payment
You can also add notes about each payment to make sure everyone is kept in the loop. Simply click on “+Add details” that’s located underneath each Payment you’ve added within your Payments Tracker. Let’s try it!
.gif)
And there you have it! You can always go back to the Payments tracker to add more details or edit your notes.
Day 12: Generate a sample Opportunity report
Estimated time: 5 minutes
Theme: Learn more about reports and why they are beneficial 📝
Day 12 checklist:
Step 1: Learn more about different reports available in Instrumentl
Instrumentl allows you to generate five different reports. You can access them by clickin on “Reports” from your Tracker. The button is located on the upper right side.
.png)
Here you’ll be able to see different types of reports with a short description for each one.
Learn more about the value of downloadable reports from Amélie by watching the 5-minute video below.
Step 2: Generate a sample Opportunity report
When you click on “Create Report”, you’ll see that reports are available only to paid users.
.png)
However, you should generate the example report anyhow! It’s important to go through the process of requesting a report. By looking at the sample, you’ll get a clearer idea on the quality, visual feel, and type of data available within the report. Let’s do that.
Looks pretty good, doesn’t it? All key information is nicely laid out within a visually engaging PDF.
The best part is that all links within the PDF are clickable. Even people outside of Instrumentl can click on them and view the opportunities that live in your account. You can instantly share your grant progress with board members or other members of your organization.
Day 13: Create a new project for a different program area
Estimated time: 45 minutes
Theme: Rinse & repeat to make an impact 💥
Day 13 checklist:
Instrumentl glossary: With Instrumentl’s Smart Grant Matching, opportunities come to you. All you have to do is share insights about your organization or program area and watch as tailored funding opportunities arrive in your inbox weekly.
Step 1: Create a new project in Instrumentl
You’re almost done with your free trial! Now is the time to add a new project to your Instrumentl account and play around with it–freestyle.
Each organization has their unique way of interacting with Instrumentl. In the last twelve days, you were familiarizing yourself with different features. Today, try to create a new Project and use Instrumentl in a way that feels the most useful to you.
We would definitely recommend adding your team members to your project as a step 2 and then evaluating both opportunities and funder matches as step 3.
Scroll back to day 1 if you want to remind yourself of the best practices and make sure you set up your new project properly.
Day 14: Have a 30 min meeting with your entire team
Estimated time: 45 minutes
Theme: Have a meaningful discussion about your grant opportunities and Instrumentl 🗣️
Day 14 checklist:
Instrumentl glossary: Instrumentl is an end-to-end grant research and management platform that can make your grant work easier. With over 15,000 live RFPs and more than 400,000 funders, we have the most comprehensive grant database in the US.
Step 1: Get your scorecards ready
Remember the scorecard we linked at the beginning of this guide? Now is the time to fill it out! If you were engaging with Instrumentl on a daily basis, it shouldn’t take more than 15 minutes to complete.
Here are some useful tips:
- Focus on quantifying your impressions (leave a score from 1 to 5 for each section)
- Jot down short notes if necessary–but leave the discussion for the team meeting
- Doing an emotional check-in is important for evaluating how does interacting with Instrumentl (both platform and our CS and Sales teams) make you feel
Once you’re done with the scorecard, bring it to the team meeting.
Step 2: Discuss Instrumentl features that you haven’t tried out during your trial
Some Instrumentl features are not that easy to test during your free trial. This is why it’s important to acknowledge what else you can use if you decide to subscribe to Instrumentl.
Let’s take the Salesforce Integration as an example.
If you use Salesforce, you’ll be happy to learn that we can streamline your data effortlessly. Instrumentl's one-way sync to Salesforce ensures your account stays in sync with the latest activity and information, eliminating data inconsistencies.
.png)
Another example is the External Client Account Linking. This is a much-loved feature by grant consultants who use Instrumentl. It enables you to seamlessly switch between clients and eliminates the need for multiple logins. Ideal for clients with their own Instrumentl subscriptions.
.png)
Step 3: Discuss upcoming Instrumentl features
Our Product Team is working on a lot of interesting new features and continuously improving existing ones based on customer feedback. To fully assess if Instrumentl is the right grant platform for you, check out the coming soon features as well. They are just around the corner!
Coming soon features include:
- Instrumentl Spenddown
- CRM Integrations
- Custom Fields
To learn more about these features and all that Instrumentl has to offer, you can go to our Pricing page and click on “Compare features across all plans”.
%20(1).gif)
You’ll see that features are grouped in three different brackets so that you can better understand the value of each feature from the lens of streamlining grant management, finding best-fit funders, and efficiently collaborating with your team members.
Next steps
Wow, you made it to the end of your 14-day free trial! Congratulations. We hope you had a good experience interacting with our Customer Success team and that you found value in the platform itself.
💰 We often hear how “Instrumentl pays for itself” because of the quality of opportunities you can find. There are also capacity grants as a viable option that can help you pay for the grant tool of your choice.
💜 But don’t trust our word for it: check out amazing success stories from our customers here.
🤓 We would encourage you to take a step back and assess if Instrumentl is the right solution for you. You can always reach out to your dedicated Instrumentl person who you chatted with during the trial kick-off call, or at hello@instrumentl.com. We will address any additional questions or support you in deciding which paid plan would be the best-fit.


